Background
The ability to set expiration dates for requestable items in Identity Security Cloud has been a feature for a while now. When somebody submits an access request, they can set the expiration date to automatically have that access removed when that date is reached. The automatic removal works well, but it does have the limitation that access requests cannot be configured to make expiration dates required. As such, approvers then typically must confirm that the access requests they receive have a date when required and that the date is within the accepted timeframe. This can lead to human error when approving items, or unnecessary review/denial of access items when expected expiration dates are not supplied.
Challenge
The idea of making the expiration date mandatory is a popular idea on the SailPoint Ideas Portal, but unfortunately we do not have a timeline for when this feature could be released as the idea is currently marked as ‘Future Consideration’. This workflow design is not intended to be an exact replacement for potential out-of-the-box functionality, but to provide a useful alternative for the folks that require this capability.
The main challenges I will be addressing are automatic denial of access requests, maintaining the list of restricted access (meaning access that requires an expiration date), and supporting different timeframes for how long access can be granted.
Solution
First, I want to give a shoutout to @zeel_sinojia for developing and sharing his “Mandatory Sunset Date” workflow. This blog post utilizes his workflow and builds on it to add some extra functionality. Thank you for sharing your original workflow. It helped lead me down developing this solution that works well for us, and I hope this post continues to help other users!
Second, a quick terminology clarification point. I stuck with the use of “Expiration Date” as opposed to “Sunset Date” as this is what our end users see in the ISC Request Center. These two terms effectively mean the same thing and can be used interchangeably in this context.
Third, here is an overview of the full workflow I used to better help us solve the requirement of mandatory expiration dates. Below is the screenshot of the full workflow along with a high-level outline of the steps performed in this workflow.

- Access Request Submitted external trigger for access requests that are submitted.
- HTTP Request Action to get the specific access request that triggered the workflow. This is to get the removeDate attribute as it is not included in the trigger input.
- Define Access List variables. These variables will include the list of entitlement, access profile, or role ids for the items that should have a limited expiration date.
- Check to see if the request submitted is subject to the 24-hour restriction or the 48-hour restriction.
- If neither, the request is approved for this phase and continues to process normally with any additional approvals and provisioning.
- If the requested access is subject to one of the two date restrictions, check to see if a removeDate was supplied in the access request.
- If no date was provided, the request is denied with comments indicating that a date is required for the specified timeframe and the requestor is sent an email informing them of why the request was denied automatically.
- If a removeDate was supplied in the original request, check to confirm it is within the 24-hour or 48-hour timeframe.
- If the expiration date was set too far in the future, the request is denied with comments indicating the date was outside the allowed range of time, and the requestor is sent an email informing them of why the request was denied automatically.
- If the removeDate on the request is within the accepted timeframe for the requested access, the request is approved with comments indicating that the date is valid. The request process then continues normally to additional approvers and provisioning.
Implementation
1) External Trigger Subscription
For this Workflow, I utilized @colin_mckibben’s detailed post Implementing A Request Response Type Trigger in Workflows. Thank you very much, Colin, for providing this detailed post on how to setup this trigger/subscription! Please check out Colin’s guide for implementing the External Trigger and the Access Request Submitted Event Trigger Subscription required for this workflow.
The one change I did make is adding a filter to the subscription so that this only triggers for access requests submitted to add access, not for revocations. Please see the Considerations section at the bottom of this blog post for information about using this filter.

Filter: $[?($.requestedItems[0].operation == "Add")]
2) Get Access Request
Since the trigger input does not supply the removeDate, we must call the ISC access request status API to get this information. Starting with the HTTP Request action, we configure it to use the accessRequestId supplied by the External Trigger to get the full details of the access request.

Authentication Type: OAuth 2.0 – Client Credentials Grant
Token URL (replace with your tenant): https://tenant.api.identitynow.com/oauth/token
Client ID and Secret:
Enter the PAT credentials of a user that has the necessary permissions to get the access request information.
The PAT will require the below scope and user level:
scopes: idn:access-request-status:read
user levels: ORG_ADMIN
Please see the Considerations section at the bottom of this blog post for more information about permissions.

Request URL: https://tenant.api.identitynow.com/v2024/access-request-status
Request URL Parameters: filters | accessRequestId in "{{$.trigger.accessRequestId}}"

Method: GET
Request Content Type: JSON
3) Mandatory End Date Access List
This next step uses the Define Variable operator to define two variables: ‘24 Hour Items’ and ‘48 Hour Items’. Items in the ’24 Hour Items’ list must have a removeDate and it can only be set to 24 hours (or one day) in the future from the date the request was submitted.

Select ‘Create New Variable’, name the variable ’24 Hour Items’, and enter a description if desired. Select the Editor tab near the top of the window and add new text data to the variable.

Enter one or more ids into the text field separated by a delimiter. These ids can be entitlement ids, access profile ids, or role ids. It just depends on which types of items you want to be part of this 24-hour restriction. They can all be added in the same text field with the delimiter between them. In this case, I used the ‘pipe’ symbol, ‘|’, to separate the ids, but something like commas can also be used if preferred.

Once you have entered the required ids, save the changes you made to your variable. The same setup can be followed for the ’48 Hour Items’ variable as well. These two variables allow you to have multiple time restrictions and the ability to add/remove items from these lists when needed.
4) 24 Hour Restricted Access Check
This is a Compare Strings operator that will check to see if the access item that is in the original request should be restricted to the 24-hour time limit. This is done by checking to see if the previously defined ’24 Hour Items’ list contains the id of the requested access item.

Value 1: $.defineVariable["24HourItems"]
Comparison Operator: Contains
Value 2: $.hTTPRequest1.body[?(@.accessRequestId == $.trigger.accessRequestId)].id
If the ’24 Hour Items’ variable contains the requested access item, the workflow moves into the True branch. Otherwise, it continues down the False branch where it will then perform the 48-hour check. It is important to note that if you are utilizing these different time restrictions that the lowest value should come first in the workflow so that it is evaluated first (24-hour check before the 48-hour check). This ensures that the shortest restriction will get evaluated first in case the same id is added to both variables.
We will continue down the True path of this workflow first as the 48-hour check is essentially the same workflow, just with some changes to accommodate the longer time restriction.
5) Is Null Check
Now that we know the item being requested should be subject to the 24-hour restriction, we want to first check to see if the removeDate exists or if it is null. For this, we use the Verify Data Type operator to check and see if the removeDate attribute is null.

Value: $.hTTPRequest1.body[?(@.accessRequestId == $.trigger.accessRequestId)].removeDate
Data Type: Is null
If the removeDate is null, the workflow will follow the True path to deny the request and email the requestor. If the removeDate is not null, it will follow the False path to then compare the removeDate against the specified restriction.
We will continue down the True path first.
6) Deny Request – No Date Provided (Is Null Check – True)
This is another HTTP Request action, but it doesn’t require the use of a PAT as it is just responding to the subscription.

Request URL: $.trigger._metadata.callbackURL

Method: POST
Request Content Type: JSON
Request Body: {"output":{"approved":false,"approver":"Workflow","comment":"Expiration Date is mandatory. Please submit a new request with an expiration date less than 1 day in the future."},"secret":"{{$.trigger._metadata.secret}}"}
The Request Body is where the workflow is responding to the trigger subscription with the information to deny the access request and to apply comments as to why the request was denied. These comments can be updated based on preferred language.
7) Email Requestor and End Workflow
The next three steps in the workflow involve getting the requestor’s email address, composing/sending the email address, and ending the workflow.
Using the Get Identity action, we can input the requestor’s identity id from the trigger input and receive the identity object, which includes their email attribute.

Identity: $.trigger.requestedBy.id
Next, we generate and send the email body which details why the request was denied using the Send Email action.

Recipient Email Address: $.getIdentity.attributes.email
From: youremail@domain.com (Neglecting to update to the email address used for ISC notifications in your tenant will cause the send email action will fail.)
Subject: Your request for access for {{$.trigger.requestedFor.name}} was denied.

Body: This can contain any wording you want in the email along with other attributes/variables used in the workflow. We are using {{$.trigger.requestedBy.name}} to get the requestor’s name, {{$.trigger.requestedItems[0].name}} to get the name of the access item, and {{$.trigger.requestedFor.name}} to get the name of the intended recipient of the access request.
Finally, we have an End Step - Success operator for the workflow that is used to summarize why the workflow ended. You can just use a single end step operator for your workflow, but having these individual ones can make it easier to look back at the execution history and see what logic path was followed in the workflow.

8) 24 Hour Expiration Date Check (Is Null Check – False)
Going back to the ‘Is Null Check’ step (#5), we are going to go down the False path now (removeDate is not null, meaning it exists). We need to check if the removeDate falls within the 24-hour (1 day) timeframe. This is done by using a Compare Timestamps operator to check if the removeDate meets this criteria.

Value 1: $.hTTPRequest1.body[?(@.accessRequestId == $.trigger.accessRequestId)].removeDate
Comparison Operator: Is On or Before X Days in the Future

Value 2: 1
This operator resolves to True if the removeDate is 1 day or less than 1 day in the future, which meets our 24-hour maximum limit. Otherwise, the workflow continues down the False path.
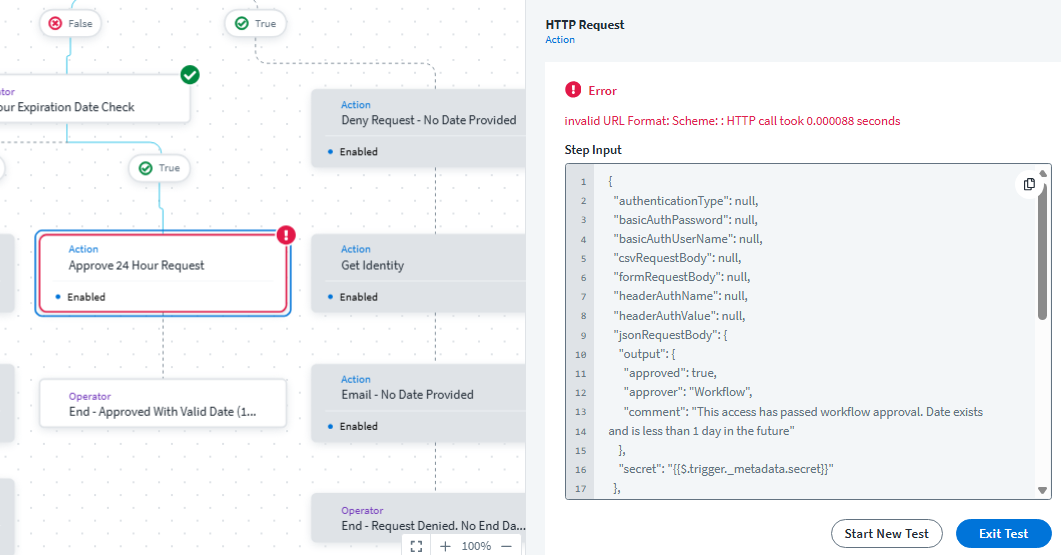
9) Approve 24 Hour Request (24 Hour Expiration Date Check – True)
If the removeDate is 1 day or less than 1 day in the future, we have confirmed the date meets the criteria for the access being requested and the request can be approved to continue the rest of the access request workflow. This is done with a HTTP Request action in the same way the “Deny Request – No Date Provided” step (#6) was handled.

Request URL: $.trigger._metadata.callbackURL

Method: POST
Request Content Type: JSON
Request Body: {"output":{"approved":true,"approver":"Workflow","comment":"This access has passed workflow approval. Date exists and is less than 1 day in the future"},"secret":"{{$.trigger._metadata.secret}}"}
Once this step of the process is approved, the access request will continue to any dynamic approvers that may be configured, SOD check, defined approval steps for the access item, and finally provision the access (assuming the approvers approve the request). This is then concluded with an End Step - Success operator indicating the workflow completed by approving the access request.

10) Deny Request – Over 24 Hours (24 Hour Expiration Date Check – True)
If the removeDate is greater than 1 day in the future, the request will be denied and no further steps will occur in the access request process. This path follows the same steps beginning with the “Deny Request – No Date Provided (Is Null Check – True” step (#6), except the email body, comments made on the access request, and end step are different to indicate the removeDate was too far in the future for this access request and a new request needs to be submitted with an expiration date no more than 1 day in the future.
11) 48 Hour Restricted Access Check (24 Hour Restricted Access Check – False)
At this point, we have detailed all the steps that occur if the access request item is subject to the 24-hour restriction. Going back up to the “24 Hour Restricted Access Check” step (#4), if the requested item is not subject to the 24-hour restriction (meaning the id of the requested item is not included in the “24HourItems” variable), we then check if it is subject to the 48-hour restriction. This Compare Strings operation and the subsequent True branch are nearly identical to the “24 Hour Restricted Access Check” step and the True path of the workflow, except we check the “48HourItems” variable instead, confirm the removeDate is on or before 2 days in the future (as opposed to 1), update the comments on the Approve or Deny steps to note that the expiration date must be 2 days or less, update the email body to indicate the expiration date must exist and be 2 days or less, and create the specific workflow end steps for these different paths.

Value 1: $.defineVariable["48HourItems"]
Comparison Operator: Contains
Value 2: $.hTTPRequest1.body[?(@.accessRequestId == $.trigger.accessRequestId)].id
This step is optional if you only have one date restriction you want the workflow to evaluate against, as opposed to both the 24-hour and 48-hour date restrictions in this case. If that is the case, this comparison operator can be removed along with the items in the True path. The next step “Approve Request – No Date Required” can be attached directly to the “24 Hour Restricted Access Check” False path. Since the True path of the “48 Hour Restricted Access Check” operator follows the same logic as the “24 Hour Restricted Access Check” (with the few minor changes mentioned), we will look at the False path in more detail.
12) Approve Request – No Date Required (48 Hour Restricted Access Check – False)
We have confirmed that item in the access request is not subject to either the 24-hour restriction or the 48-hour restriction and should continue to follow the access request flow as normal. This involves responding to the trigger subscription to approve the access request and ending the workflow using a HTTP Request action.

Request URL: $.trigger._metadata.callbackURL

Method: POST
Request Content Type: JSON
Request Body: {"output":{"approved":true,"approver":"Workflow","comment":"End date not mandatory."},"secret":"{{$.trigger._metadata.secret}}"}
This step adds comments to the access request saying an end date is not mandatory for the access being requested. This is helpful when testing, and may be desirable in a Prod instance, but this comment can also be removed to just allow the request process to flow normally instead of adding a comment to every non-restricted access check. Remove the ‘End date not mandatory’ comments and just leave the empty double quotes (“”).
Finally, the workflow ends at the End Step – Success operator named “End – Approved No Date Required”. The access request will flow as normal to the next appropriate approval and provisioning steps.

Workflow File
MandatoryExpirationDateExample20250124.json (28.5 KB)
Considerations
In this workflow, we defined two separate time restrictions: 24-hours and 48-hours, and the items that are subject to these restrictions. As previously mentioned (step #11), the second restriction can be removed if only one time restriction is required. Additionally, if more time restrictions are required, they can be added to the False path of the “48 Hour Expiration Date Check” step by copying all the steps in the True path of the “48 Hour Expiration Date Check” and defining a third variable in the “Mandatory End Date Access List” operation.
The variables that contain the ids of the access items that are subject to the time restrictions are unlikely to change often, but if your organization plans to update these values often, it seems like it should be possible to utilize an interactive form and a separate workflow to add/remove items to/from these variables. This was not something I developed as these variables won’t change too often and we will just edit the variables in the workflow when items need to be added/removed, but the interactive form is an option to consider if you want to build a more user friendly option to add or remove items from these variables or if the folks that will make these changes shouldn’t have the access to directly edit workflows. If this is of interest, let me know and I can try to see if I can work on something in my spare time.
I opted to use a filter on the subscription to filter on only access requests to add access. If you do want to customize your workflow to take some action on access revocation requests, this filter should be removed so the workflow gets triggered. Instead, you would want to add a conditional check after the External Trigger step in the workflow to determine if the operation is Add or Remove to then take the appropriate actions. Add operations would follow the rest of this mandatory expiration date workflow and Remove operations would be whatever processing you want to occur for revocation requests.
In case of some unexpected issue that causes the workflow to not execute properly, I opted to use a subscription deadline of 5 minutes (see External Trigger step screenshot, PT5M). This allows the access request to fail more quickly, which can lead to us being notified sooner of an issue. If your workflow has some additional processing time and you find responses are not being returned quick enough, this deadline can be increased as needed. Just note that if there is an issue in the workflow that causes it not to respond to the subscription, it will take this amount of time before the access request fails, so the request will be sitting in a pending state for this duration, even though it will not be able to complete successfully.
With the release of the new Access Request Administration functionality, two new user levels were added along with the /access-request-administration endpoint. This can be used instead of the /access-request-status endpoint if you are looking to use the PAT of an identity with a lower user level. If you would prefer to use this endpoint instead, update the Request URL accordingly and ensure the PAT has the below permissions.
scopes: idn:access-request-administration:read
user levels: ORG_ADMIN
Currently, you will also have to add the experimental header to this action.
X-SailPoint-Experimental | true
References
Thanks again @zeel_sinojia for your initial workflow this was built upon! - Mandatory Sunset Date
Thanks again @colin_mckibben for detailing how to implement a request response type trigger! - Implementing A Request Response Type Trigger in Workflows
Event Trigger Documentation - Event triggers | SailPoint Developer Community
Workflows and Additional Event Trigger Documentation - Workflows - SailPoint Identity Services