The IdentityIQ Deployment Accelerator (IIQDA) is a plugin for the popular and free IDE Eclipse that provides several features designed to make configuring and managing IdentityIQ easier.
This tool is not an officially supported product and is made available free of charge, with no support agreement, for the benefit of the implementer community.
IIQDA offers the following features:
Integration with multiple IdentityIQ environments (Dev, Test, QA, etc.)
Direct deployment, with token substitution, into any connected environment
Direct export/extract, with token replacement, from any connected environment
Listing of modified objects in a specific IdentityIQ environment
Complete Services Standard Build (SSB) compatibility an integration
Source code completion (auto-complete or “intelli-sense” like editing) in rule editors
Comparison of the local copy with the version in any connected environment (with optional ignoring of deployment things like id, created, modified attributes etc.)
Remote debug viewer (requires some configuration on the connected environment)
Workflow manipulation
Skip to a definition from with ‘Open Declaration’
Insert a step
Rename a step
Special outline view
Run a task on a remote IIQ instance
Import a collection of artifacts together
Hot deploy classes into a running (debug-mode) Tomcat
Wizard for creating projects for IdentityIQ plugins
EXPERIMENTAL: IdentityNow support
IIQDA is a plugin for the Eclipse Integrated Development Environment. The tool consists of two components: a feature that is installed via the Eclipse installation framework and a Workflow object that is imported into each IdentityIQ system. The feature provides extended functionality to Eclipse to support IdentityIQ uses cases like token substitution and deployment and extraction. The Workflow object adds functionality to an IdentityIQ installation to support interacting with the Eclipse plugin. When the plugin interacts with IdentityIQ it invokes the Workflow via a REST call to perform the various activities that the plugin supports. The plugin can also supports a logging interface where log messages can be sent back from IdentityIQ via a log4j Appender into a logging tab in the Eclipse console. This allows development work, including the printing and reading of log file statements, to happen entirely inside Eclipse and minimizes Alt-Tabbing to log windows running “tail” or the need to have a remote desktop instance to a remote server running IdentityIQ. It also allows multiple connected clients to filter out different debug messages for collaborative development and testing.
NOTE: If you have a pre-4.0 version of the plugin installed, you will need to remove it. Due to some internal reorganisation in this release, Eclipse sees this as a different plugin and not an update. Also, if you have pre-4.0.beta projects, you will need to update the .project file manually. See the section Reconfiguring an existing Eclipse project into an IdentityIQ project, just update the iiqArtifactBuilder and iiqNature lines to match the new format.
Requirements
IIQDA is tested and works on the following software platforms:
IdentityIQ versions 6.3 and newer.
IIQDA will not work with IdentityIQ versions 6.2 or earlier. 6.2 and earlier releases lack the necessary REST and Workflow interactivity features to support the plugin. It is only tested on the latest version of IdentityIQ (currently 7.3).
We encourage all new installations to use the latest 1.8 JDK release from Oracle. The plugin has not been tested against a JVM release from IBM; it may work fine, but no successful tests or failures have been reported to date.
Guide
Installing the plugin
Supported Eclipse versions
IIQDA is supported on 4.5 SR1 (Neon) or newer. For the smoothest experience we recommend using the Neon release of Eclipse with the IIQDA plugin. The plugin may work on later releases of Eclipse without modification. It may also run on earlier versions, but this is not a supported combination.
Check the box next to the Feature, and click ‘Next’. Review the item and click ‘Next’ again
Accept the terms of the agreement, and click ‘Finish’ (You will need to accept that the software contains unsigned content, and restart eclipse).
Note: If you have been using versions of the Deployment Accelerator prior to version 2.2, you will need to manually remove the .jar file from your /dropins directory.**
Offline installation
If you are behind a restrictive proxy or firewall, you may not be able to connected Eclipse to the update site above. In this case, you can go to The latest IIQDA - IdentityIQ Deployment Accelerator plugin, and download the zip file there. Add a repository as above, but instead of pointing to the web URL, click the ‘Archive’ button and point to the zip you just downloaded.
Configuring the server side workflow
Next, you need to import the “Workflow-Importer.xml” workflow object into your IdentityIQ instances. The latest version will always be available at http://sailpoint.github.io/epiiq/Workflow-Importer.xml - but a copy of this file bundles with the plugin will be placed into each newly created IdentityIQ Project. This simply involves browsing to the “System Setup → Import from File” option and importing the XML file.
Using the IIQ Console application to import the Workflow object is an alternative approach that works equally well. If you are using the Services Standard Build (SSB) then you will also want to copy the Workflow artifact into the “/config/Workflow/” directory of your project to ensure that each of your environments receives the latest copy of the workflow object when a new deployment is built.
Configuring a new IdentityIQ project
Eclipse manages groups of files as Projects. There are several types of Projects that can be managed in Eclipse, including Java Projects, Plugin Projects and General Projects. The plugin adds several new types of project to the set of project types which will be discussed in the following sections. The first is called an “IdentityIQ Project”. An “IdentityIQ Project” is basically a Java type project with extensions to handle IdentityIQ objects in a special manner.
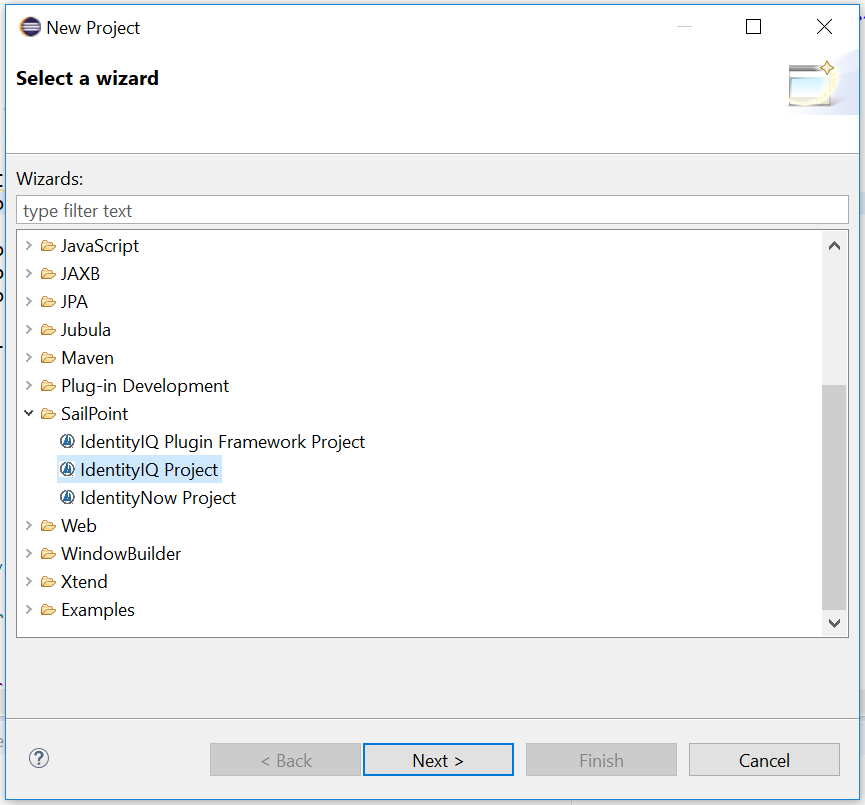
To create a new IdentityIQ project, start by selecting File → New Project. This brings up the New Project wizard. In the wizard, select the “IdentityIQ Project” option from the “SailPoint” folder.
The next screen configures the properties for our IdentityIQ project. You must give your project a name and a location. The new project will also prompt you for the location, user name, and password to use to connect to a development instance of IdentityIQ. Usually you key in your local development environment’s details in these fields. The plugin requires two .jar files from the IdenittyIQ installation: the “identityiq.jar” file, which contains the binaries from the IdentityIQ product, and the “commons-logging-1.1.jar”, which provides logging facilities for java applications. There are three options for installing these files into your project: they can be downloaded from the IdentityIQ system specified in the URL, located in an existing project, or pulled in from a local folder. The first option is the default and most automated option.
For most applications, Debug Transport Name and Debug Port can be left as defaults
The plugin will spend a moment configuring the local project and then produce a project that you can see in the “Package” or “Project Explorer” panes of Eclipse.
This will look familiar to deployment professionals who have used the SailPoint Services Standard Build. Users creating a new project will want to create the “config” and its common subdirectories “config/Application”, “config/Rule” and “config/Workflow” by hand after creating a new project. Future releases of the plug-in will create these directories for you on command.
The new project will automatically download the “identityiq.jar” file from the default system and place it in the /lib directory of the eclipse project. This is done so that the plug-in has a reference to compile-time check rule code and java code against when editing in Eclipse. The “commons-logging-1.1.jar” is also downloaded from IdentityIQ and placed in the same directory to support the logging features of the plugin. Users are encouraged to check the /lib directory of newly created projects and add the “log4j-1.2.16.jar” file from IdentityIQ’s WEB-INF/lib directory if it is not found in your project. This file allows proper syntax editing for Rule code that uses Log4j’s logger interfaces for debugging messages. The use of Log4j logger instances is considered a best practice and is recommended for all Rule/BeanShell/Workflow code created for IdentityIQ.
Reconfiguring an existing Eclipse project into an IdentityIQ project
Deployments already using the SSB and Eclipse may want to re-tool their eclipse project so that the plugin can be used to manage artifacts in the deployment. It is possible to edit your project’s configuration and turn it into an IIQDA enabled and aware project. The way to do this is to edit the “.project” file for your Eclipse project. The “.project” file lives as a hidden text file in the directory of your project inside your Eclipse workspace directory. On your install this might be /home/john.doe/Documents/workspace/yourProjectName or something similar. Inside the yourProjectName directory you will find a file named .project. This file contains several settings for your Eclipse project. Open this file in a text editor (not in Eclipse, but rather Notepad++ or vi or similar) and edit the file.
An example, generic Java type eclipse project looks like the following:
The key properties to look at here are the “buildCommand” and “natures” properties. The example above shows a “javabuilder” for the build command and a “javanature” for the list of natures. To convert an existing project to an IIQDA enabled project we need to extend the build command and nature settings to include new properties. The following example illustrates how to add the IIQDA build command and nature settings. Lines 13-17 add the “iiqArtifactBuilder” and line 20 adds the iiqNature to the configuration file.
Save your “.project” file after inserting the lines to support the “iiqArtifactBuilder” and “iiqNature” lines and restart eclipse. Note the “.properties” file is rarely checked into version control systems so this change will need to be made on all existing eclipse workspaces that are referencing the projects.
Using the plugin
Importing objects from an IdentityIQ system
You need to edit the “xyz.target.properties” file in the root directory of your project to support importing IdentityIQ objects directly through eclipse. For each environment that you are working with, like “sandbox.target.properties” and “shareddev.target.properties” and “test.target.properties” you will need to specify the URL, username and password for the Eclipse application to be able to connect. Example settings for those values look like the following:
# Properties file for environment specific build tokens
# THIS IS A SAMPLE - ADD REMOVE TOKENS PER PROJECT
%%TARGET%%=sandbox

%%ECLIPSE_PASS%%=admin
%%ECLIPSE_URL%%=http\://localhost\:8080/iiq64lab
%%ECLIPSE_USER%%=spadmin
The plug-in allows you to extract XML configuration files from an IdentityIQ instance, downloading them into your project in Eclipse, without leaving the eclipse application. This process is called “Import” because it is importing an artifact from an IdentityIQ instance into the eclipse project. To import an XML configuration from an running IdentityIQ instance select either the project’s root directory or the “/config” folder or a sub-directory of “/config” and right-click and select the “Import Artifact” option and then select a “target: XXXXXX” option as shown below.
The target you select from specifies which IdentityIQ system you would like to import a file from. The example above shows a singleton system where only a “default” IdentityIQ target system exists. More complex or mature configurations may have multiple targets defined, as shown below. Installations using the SSB will have configurations with targets named common names like “sandbox”, “shared-dev”, “uat”, “qa” and “production”. The example below shows project configuration with 3 known IIQ systems: “default”, “iiq62demodata” and “iiq64alpha”.
Select the target system you want to import a configuration file from in the list. This will bring up the “Import a Resource” dialog box. This dialog box allows you to specify one of two modes of choosing which item to import. You can find objects to import by their “Category” (really their object Class in IdentityIQ) or you can search for them by listing the most recently changed objects and selecting objects from the list of most recently changed items in that IdentityIQ instance. The following figure shows an example of having selected “Application” type objects in the “Import by Category” tab.
Please note that when importing objects by most recently changed time, you have the option to filter which object types are included in the list. To apply a filter, click the ‘filter types’ button. This will present you with a list of checkboxes that allow you to select which types of object are included. This list is initially populated according to the selection in the workspace preferences - more on this later on.
Both screens allow to select multiple files to import at the same time. As the files are imported they have “Reverse Tokenization” applied, which is described in detail below. New files are created in the folder that was selected to place the imports into and the XML files are opened in the text editor of Eclipse as shown below. The example below shows what happens when the “Application” named “SampleDB” is imported from the default system and placed into an IdentityIQ project. A project-level setting allows you to decide if files that are imported will be automatically opened in the Editor.
The XML file is now available for editing, checking into a source control system. diff(-erencing) with other files, or for deploying out to other environments. Deployment is covered in the next section of the document.
Deploying objects into an IdentityIQ system
The plug-in supports automating the deployment of XML-based artifacts and configurations to a running copy of IdentityIQ on a remote server. Deploying is conceptually the compliment to Importing; in a deployment an XML configuration artifact is pushed out of the Eclipse project and uploaded to a running instance of IdentityIQ.
The way the plug-in does this is by applying tokenization transformations to the XML file and then uploading it to the selected instance of IdentityIQ and performing the import with a workflow action. This greatly reduces the time spent browsing to the “System → Import from file” interface of IdentityIQ to import a single XML file. It also reduces the time spent running “ant importdynamic” command for installations using the SSB that require tokenized transformations of the XML content. This feature allows quick single and multi-file deployment to a specific IdentityIQ environment for testing.
To deploy a file to a running copy of IdentityIQ, simply select the file(s) you would like to deploy in the project tree and right-click and select the “Deploy Artifact” option. You will be prompted for which IdentityIQ instance you would like to deploy the XML file into.
As the file(s) are uploaded during deployment the plug-in applies any target-specific token transformations to the XML file before it is uploaded to the IdentityIQ system. This means the the plug-in can automate substitution of things like service accounts, encrypted password, or differences in OU structures across different environments. For more details on how tokenization works, see the next section.
Configuring token substitution
Token substitution is the key feature that allows the services standard build (SSB) for IdentityIQ to manage multiple environments which use slightly different configurations from a single set of configuration files. The IdentityIQ Deployment Accelerator uses an identical and compatible tokenization strategy like the one found in the SSB.
The need for tokenization arises when there are necessary differences in configuration between sandbox, development, QA, and production instances of IdentityIQ. Most deployments require that the exact same configuration files which goes for testing be used in the production deployment. Because IdentityIQ stores so many configuration details in XML, a solution that allows testing against one configuration set and deployment of another almost identical configuration set was necessary. Commonly sandbox, development, and QA environments are configured to not support provisioning to a production system. They do often read from production data, however. In other scenarios, development and QA environments have their own full read/write copies of systems like active directory or LDAP servers. In these scenarios the organizational unit structure and and username and passwords for service accounts differ from those used in production. In order to maintain strict adherence to the “deploy only what we have tested and approved” SDLC paradigm, automated tokenization has been introduced to programmatically perform search and replacement of the specific configuration elements that differ among IdentityIQ environments.
Each target environment has its own token configuration file in the root folder of the project directory. These files are named with the pattern “[environment name].target.properties”. Examples include “dev.target.properties”, “qa.target.properties” and “sandbox.target.properties”. What these environment names mean is specific to your project’s environment. The plug-in has no hard-coded dependencies on environment names but will produce a factory default file called “default.target.properties” so that at least one environment exists in the project.
Here is the body of an example environment’s “target.properties” file:
# Properties file for environment specific build tokens
# THIS IS A SAMPLE - ADD REMOVE TOKENS PER PROJECT
%%TARGET%%=sandbox

%%ECLIPSE_PASS%%=admin
%%ECLIPSE_URL%%=http\://localhost\:8080/iiq63lab
%%ECLIPSE_USER%%=spadmin

%%AD_ADMINISTRATOR_NAME%%=CN=administrator,OU=Users,DC=example,DC=com
%%AD_PROXY_PASSWORD%%=myencryptedpasswordstring
In the example above tokensAre defined as strings in between pairs of double percentage marks (“%%”). Tokens resemble old DOS environment variables were chosen because the %% pattern is not commonly seen in XML configuration files. The target on line 3 is required by the plug-in, and it identifies the target name that the plug-in uses in the eclipse interface. Lines 5, 6 and 7 are required by the plug-in and identify what target URL and credentials should be used by the plugin to upload artifacts to the IdentityIQ system. After that, the remainder of the file is user configurable tokens that are Applied to XML configuration files as they are deployed to an Identity IQ system. Any pattern of %%AD_ADMINISTRATOR_NAME%% found in .xml files in the example system will have the administrator CN substituted in as the XML file is deployed.
Tokenization as an important feature for managing configurations of multiple environments and its use Is highly recommended.
The plug-in Goes above and beyond the features normally found in the SSB by providing features for reverse tokenization. This means the EPIIQ plug-in can extract an XML file from an IdentityIQ system and re-insert the tokens as if the file were a generic file intended for use across multiple environments. This allows “Round-tripping” of an XML configuration file from IdentityIQ system A, into Eclipse, out to IdentityIQ system B, back into Eclipse, and back out to IdentityIQ system A, all while preserving the specific configuration items that are required to be different for systems A and B.
Reverse tokenization settings are stored in a global configuration file that applies to all IdentityIQ instances covered in the eclipse project. The configuration file is called “reverse.target.properties” and it lives in the root directory of the eclipse project. A stub version of this file is automatically created for newly-created IdentityIQ projects in Eclipse.
The facility that the plugin uses to perform reverse tokenization is an XML XPath substitution that is performed on the XML file after it is extracted from the IdentityIQ system and as it is downloaded to the XML file inside the eclipse project. Unlike forward tokenization, which is a global “search and replace” kind of operation for all XML files being imported into an IdentityIQ instance, reverse tokenization is highly specific to the type of XML file (type of IdentityIQ object class) and even the specific name or instance of the object class. The following example illustrates how to re-insert a username token for an active directory type application as it is imported into the Eclipse project from an IdentityIQ instance:
# Example: to replace the Active Directory username with a macro, do something like:
/Application[@name\='Active\ Directory']/Attributes/Map/entry[@key\='user']/@value=%%USERNAME%%
The parsing of the XPath is left as an exercise for the reader. The FireBug or SketchPath tools are recommended tools for use in the field when writing your own XPath statements for reverse tokenization. Future revisions of this User’s guide will provide more in-depth example XPath statements supporting reverse tokenization. If you have a specific question on implementing a particular XPath statement, please post the question in the support forum area listed at the bottom of this document.
###Creating new IdentityIQ objects in Eclipse
The IdentityIQ Deployment Accelerator has the ability to create skeleton Rule objects in your project. The skeleton will detail what the expected inputs and outputs are in a comment block and provide the relevant XML structure ready for deployment into IdentityIQ.
Right-click on your project, or a folder in your project, and select New-IdentityIQ Rule.
From here, you can select the type of rule you want. The wizard will display the description as found in the IdentityIQ rule registry, and provide a default name based on the type of rule selected.
The name can, of course, be replaced to reflect what this particular rule will be doing.
Once you have selected a rule type, entered a name and clicked Finish, you will be presented with your rule skeleton in an editor. From here, you can edit your rule to perform the required function.
Editing Rules and other IdentityIQ artifacts is the core reason for the Eclipse plug-in existing. Professionals deploying IdentityIQ needed a faster way to extract, edit, and re-import configuration and code modules to minimize the round-trip time for configuration changes and edits to an instance of IdentityIQ. Fortunately, this process is rather simple and will feel familiar to users who have regularly edit Java code in Eclipse.
Following the standard Eclipse paradigm, opening an artifact is as simple as double-clicking on it.The artifact will then be displayed in the main editor window, with error and warning markers applied to it. Markers are an Eclipse feature which underlines an error (in red) or warning (in yellow). It will also put a corresponding mark in the right margin that can be clicked on to quickly navigate to the marker, or hovered over to display the message corresponding to that marker.
Note: Currently the artifact is only validated on save, or a ‘clean’ of the project. This will be fixed in a future version so that the artifact is validated when it is opened. The workaround is to add/remove a character in the main window and then save it.
Referencing non-declared variables
Sometimes (especially in workflow scripts) there will be variables available at runtime that are not declared in the signature for that particular type of script. This presents a problem for the code validator, since it can’t verify variables that it doesn’t know about. The way to announce these to the validator is to add a comment in your script, that tells it to expect a variable to be available
// Expect: <variable type> <variable name>
The variable type needs to be the fully qualified class name of the relevant type, for example
// Expect: sailpoint.object.Identity newIdentity
Note: The capitalization and spacing are important for the plugin to be able to recognize the declaration
Defining workflow variable types
IdentityIQ does not require the variable declarations in a workflow to define a type. However, to correctly identify problems with scripts in a workflow, the variable type (if they are not the default of ‘string’) needs to be declared. This is as simple as adding a ‘type’ attribute to the variable declaration (this example is taken from a LifeCycleEvent workflow)
  <Variable input="true" name="event" transient="true" type="sailpoint.object.IdentityChangeEvent">

    <Description>

      The IdentityChangeEvent. It can be used to build

      the provisioning plan, but does not need to be

      persisted with the case, so marked as transient.

    </Description>

  </Variable>
Defining arguments to a rule
Similar to the workflow variables, arguments to a rule can also have a type. Again, this is not required or used by IdentityIQ at runtime, but the validator needs to know what type the argument is. The slight difference here is that the validator will recognize classes from the sailpoint.object and java.util packages without full qualification:
The Problem view in eclipse is a view that displays the ‘problems’ associated with either the whole workspace, the currently selected project, or the currently selected item. If you do not see the Problems view in your IDE, you can add it by going to Window->Show View->Problems. it will look something like this:
Any error or warning can be double-clicked on to open the relevant file and take you to the marker.
Quick fixes
Some markers have a quick fix associated with them. Right-clicking on the entry and selecting ‘Quick Fix’ will present you with a dialog of possible fixes. The key fixes provided by the plugin are:
Surround the script in a tag with tags
Fix a missing open or closing CDATA tag
Go to a connected environment to find a missing referenced object, and import that object into the project.
System objects
Some project artifacts will reference standard IdentityIQ artifacts (for example Library rules, or Sub-Workflows). You don’t want to have these maintained as project artifacts, but you do want to be able to validate references to them. For this reason, there is a ‘system’ directory created in the project. Any artifacts placed in there (for example the workflowSubs.xml or rules.xml files from a standard IdentityIQ install) will be used to check for references, but will not be validated and have markers placed in the problems view.
Workspace and project preferences
The IdentityIQ Deployment Accelerator allows you to tailor both your workspace and your individual projects to fit the way you work.
Workspace preferences
Some preferences apply to the workings of the plugin, regardless of which project you are currently working with. These can be accessed via the Eclipse → Preferences menu (or, on Windows, Window → Preferences), under IdentityIQ Preferences.
When creating new projects, generate the directories normally associated with the SSB structure
Automatically add CDATA tags
When objects are persisted in the IdentityIQ database, any CDATA tags present are stripped off. This option reapplies the CDATA tags during import, replacing any entities with their character counterparts; for example & is converted back to &, < to < etc.
IdentityIQ Import Preferences
This sub-page is a list of all the object types in IdentityIQ; these are the default selections that will be available when you go to import artifacts and use the ‘import by recently changed’ tab. You can still modify the list of object types in the import dialog; this page is simply the defaults that will be used.
Project preferences
These are the settings that are applied to just the project; for example, you may have two different server installs, which are on very different hardware and therefore respond in very different times. In this circumstance, you may wish to increase the timeout threshold for that project.
The project preferences can be accessed by right-clicking on the project and selecting ‘Properties’
Maximum number of script lines before CDATA should be used
As a style guide, the plugin will recommend that BeanShell script is surrounded with CDATA tags. This is really overkill for short scripts (for example, ‘return null’) so we allow you to configure your project based on your own style guidelines
Connection Timeout (ms)
This setting allows you to configure how long a REST call to the IIQDA Workflow deployed in IdentityIQ will wait before returning a ‘timed out’ error to the user
Open Files on Import
This setting allows you to configure whether imported files will automatically be opened in an editor.
Excluded directories
This list of directories within your project will not be validated during a project build.
Errors and Warnings
This page is a list of Markers that can be applied to your artifacts when they are validated. The possible values are ‘error’, ‘warning’ or ‘none’. Error and Warning will underline the relevant section in red or yellow, and place an entry in the ‘Problems’ view. ‘None’ turns off checking of this particular marker.
Remote debugging
The plugin provides a Log View that will connect to an appender installed on a connected environment, and display filtered log messages into the Eclipse environment.
Configuration
When you create a new project, a jar file called ‘SSAppender.jar’ will be placed in the ‘lib’ directory. This file needs to be placed in the WEB-INF/lib directory of your IdentityIQ installation.
The log4j.properties file in your IdentityIQ deployment needs to be modified, adding the following section:
Where is the port you want your server side component to be listening for connections from clients.
Now you will also need to modify log4j.properties to add our new Appender as a ‘root appender’, so all log messages get sent to it and it can decide whether or not to forward these to clients.
Change
log4j.rootLogger=warn,stdout
to
log4j.rootLogger=warn,net,stdout
Note: If you are interested in learning more about configuring log4j, please take a look at Apache log4j 1.2.
Once this is done, you can open the view in Eclipse. Window → Show View->Other, Then navigate to SailPoint → IdentityIQ Log View
To configure the view to connect to IdentityIQ, right-click on the window and select ‘options’. In this window you can specify the address of the server IdentityIQ is deployed on, and the port you specified above in log4j.appender.net.port
You can also click ‘Add Log’ to specify one or more class/package and log level entries.
To connect, right-click on the window and select ‘connect’. The icon on the window tab will change to a red disconnected plugconnecting.png, and if the connection is successful, a black connected plugconnected.png. Log messages will now be displayed in the window
If the view loses the connection (for example, a restart of IdentityIQ), the icon on the tab will change back to a red disconnected plug. Once connection is re-established, it will change back to the black connected plug.
While connected, you can add/change/remove Log entries in the options window. These will be updated in real time.
Workflow manipulation
While editing a workflow, there are several productivity features available to you:
With your cursor in a element, you can press F3 (Open Declaration) in order to move your cursor to the named in the transition
With your cursor in a element, you can right-click and select Source → Insert Step. Once given a name, the plugin will make any steps that transitioned here transition to the new step, then the new step transitions here
With your cursor in a element, you can right-click and select Refactor → Rename Step. Once given a name, the plugin will replace the name of the step, and also update any elements that point to it.
There is also a custom outline view to let you easily navigate through the workflow.
Tooltips will provide extra information for certain elements. For example, hovering over a Transition element that has an XML comment in the preceding line, and a ‘when’ attribute to decide when to follow this transition, looks like this:
To run a task on a target server, right-click in an open IdentityIQ type document (Workflow, Rule etc.) and select Run Task by hovering over the right arrow next to ‘Run Task’. Now select a target by hovering over the arrow next to your selection. The plugin will then query the target system for available Tasks and populate a new submenu. Select your desired task by clicking on it. The task will then be executed on the target system, while a dialog box shows progress of the task.
Classes can now be ‘Hot Deployed’. This is where the class inside a running IdentityIQ is replaced with a new version. This feature is very useful if you have to develop custom Java code for a project. Whereas this used to necessitate a rebuild and redeploy of the WAR file, and a potentially a restart of the application server, now we can temporarily replace the binary file on the server to test if a fix or change is working before going through the expensive redeploy options.
There are a few caveats for this method, though:
The application server (currently only tested with Tomcat) must be started with the ‘jpda’ option, so that it will be listening for debug connections.
The class has to be loaded into memory (i.e. it must have been instantiated at least once in the running server)
Classes that have a private ‘inner class’ cannot be hot deployed correctly. This is currently being investigated.
Once the server is restarted, these hot changes will be lost and the classes will go back to the versions deployed to the server
Aside from the caveats, you can right-click on a .java file in your project and select ‘Hot Deploy Class’ then select a target. Make sure that you have debugTransport and debugPort set in your .target.properties file (defaults are dt_socket and 8000)
IdentityIQ plugins
The Deployment accelerator now supports the creation of skeleton projects for IdentityIQ plugins. Plugins were introduced in version 7.0, and allow a developer to extend the functionality of IdentityIQ in a supportable, repeatable way. A plugin can augment the standard UI of IdentityIQ, as well as being able to implement Widgets, Services, REST services and have its own datastore. Plugins can be enabled and disabled for debugging, and are installed by simply dropping the plugin’s zip file onto the Plugins page.
To start creating a plugin, start by selecting File → New Project. This brings up the New Project wizard. In the wizard, select the “IdentityIQ Plugin Framework Project” option from the “SailPoint” folder.
The first page is the basic Eclipse Project Name page. The second page is for basic plugin settings - some of the fields will be automatically generated based on the
The internal name of the plugin - this will, for example, be used in constructing the URL for the plugin’s full page
Version Number
The version of the plugin
Minimum System Version
The minimum version of IdentityIQ required to run this plugin
Minimum Upgradeable Version
The minimum version of this plugin that can be automatically upgraded, maintaining current configuration options
Plugin Right Required
The SPRight that users require in order to use the plugin
The Next page defines the full page that the plugin provides. The full page name is the text that will appear in the browser’s title bar when this page is displayed. The page can be accessed at /plugins/pluginpage.jsf?pn=
If you configure settings, the name is what you will use to reference the setting in your code. Label is what will be displayed when you hit the ‘configure’ button on the plugin page. To use the configuration settings in your code you can use PluginBaseHelper.getSettingXXXX(uniqueName, settingName)(or another base plugin class such as BasePluginService will have getSettingXXX(name)).
The next page configures snippets. Snippets are pieces of JavaScript (and CSS) that can be injected into a page at runtime. For example, to add an icon to the menu bar that, when clicked, would direct the user to the plugin’s full page.
This is the pattern the URL the user is at must match, in order to inject the JavaScript and Css. for example, ‘.’ would match every page. './systemSetup/index.jsf’ Would match the System Setup page, for example to add a new configuration link to the table
Right Required
The user will need to have this SPRight for the snippet to be injected into their page
Script Includes
A list of JavaScript files that will be injected as part of this snippet. Skeleton files will be created with a sample snippet to add an icon to take the user to the plugin’s full page
CSS Includes
A list of CSS files that will be injected as part of this snippet. Skeleton files will be created
When the snippet has been configured, ‘Add Snippet’ will transfer the settings to the ‘Defined Snippets’ list. Multiple snippets can be configured for each plugin.
The Base part of the URL that will provide the REST Services. This will be in the URL /plugin/rest//
Base SPRight
The SPRight the user will need to have in order to call any of these endpoints
Class Name
Java class implementing the REST services. Name will be generated based on the Base Endpoint, but can be customized
Method
HTTP Method for the individual REST Endpoint
REST EndpointName
This will be the Endpoint part of /plugin/rest//
Java Method Name
Method implementing this REST endpoint. Generated based on Method and REST Endpoint Name, but can be customized here
Return Type
Java return type
Specific SPRight
If you want a specific SPRight to be required for this individual endpoint, specify it here
Clicking ‘Add’ will add the individual Endpoint configuration to the list. All endpoints will be defined under the Base Endpoint so the URLs will be as detailed above.
Next page is Services. Services are pieces of code that run in the background on a predefined schedule. For example, Heartbeat and Full Text Index refresh are out-of-the-box services.
Fields are self explanatory. The Class Name is generated based on the Service Name, but can be customised here. Clicking ‘Add’ will add the service configuration to the list, for creation when the wizard is finished.
Next page is Widgets. Widgets are basically ‘cards’ that can be added to a user’s dashboard (home page). For example, the out-of-the-box ‘Certification Campaigns’ and ‘Risk Score’ widgets, and the Sales Engineering-developed ‘Sensitive Data Users’ and ‘IdentityIQ Statistics’ widgets.
Widgets generally need to get data from the server, rather than being static content, so Widgets generated through the Plugin Wizard will have a skeleton framework for using Angular on the client side and a REST service on the server side to provide content to the widget.
Widget configuration is straightforward in the wizard. You need to give a widget name (which will be used in internal representations, e.g. in the object, and the generated REST service), and a description. The description will be used as the title text when the widget is displayed in the user’s home page.
As before, the Add button is used to add the configuration to a list of items that will be created when the wizard is finished.
The penultimate page is rights and capabilities. Capabilities in IdentityIQ are collections of rights (SPRight objects) that can be assigned to users either directly or through Workgroups (and, if correctly configured, Roles, but we’re starting to stray off topic.)
This page allows the creation of Capabilities from the SPRights that have been generated on the previous wizard pages. It also allows creation of arbitrary new SPRights. Once a Capability name is entered and some SPRights are selected (use CTRL-Click to select multiple SPRights), the Add button next to the capability name will transfer the configuration to the list of objects to be created when the wizard is finished.
The last page is for libraries and IdentityIQ location.
The first field is for a location for an existing IdentityIQ installation. This is required to reference the SailPoint classes during the build process.
Next is a list of libraries to reference. These are libraries that you know will be available in the target environment; you’ll need local copies in your project to build against, but you don’t want them included in the output.
Lastly is a list of libraries to include. As you would expect, these are libraries that will be copied to your project, referenced during the build, and included in the final output.
Once you’ve entered a valid IdentityIQ location your Finish button will be enabled, and you can click Finish to generate your plugin project.
Technology preview: IdentityNow support
Included in the latest version of the plugin is a preview of what is intended to be full support for (at least) import and export of IdentityNow objects, to enable simplification of the processes of backup, restore, and migration or sharing. The most obvious example of this would be for sharing useful data transforms. IdentityNow’s API is still very much in its infancy, and as it matures we will be looking to implement support for more object types.
To begin, select File → New Project. This brings up the New Project wizard. In the wizard, select the “IdentityNow Project” option from the “SailPoint” folder.
If you have the API Key and secret for your org, you can enter them directly. The ‘validate’ button will make a test connection to your Org to confirm you have entered them correctly.
If not, you’ll need to enter an admin username and password. These will be used to get an API key and secret from your Org. Your login will need to be ‘stepped up’ in order to generate API credentials. If you have ‘re-enter password’ configured on your Org, the plugin will just do that. If not, you’ll need to select a step-up method.
The list will be limited to the step-up methods configured on your Org. So, for example, if you selected ‘Send text to alternate phone’, you would be prompted to enter the code sent by SMS to your phone
Once you’ve entered the verification token correctly, you should get the API Key and secret fields populated.
Right-clicking on the project will allow you to select ‘IDN Import Object’ and then your target environment (at this point you will only have ‘Default’). Currently you can select to import a Source, or a Transform.
Importing a Transform will open into an editor where you can arrange the sub-elements of a transform. Right-clicking on any of the transform types in the transform will allow you to do things such as making this the input to another transform (surrounding this one) or make another transform the input to this (new child).
This functionality is the newest addition to the Deployment Accelerator and most likely to be the location of bugs, so please report anything you find.
FYI: To build this, you will need Maven 3.8.6, because of a regression in Maven 3.9.x.
Run the command mvn clean package. As of Nov 2, 2023, the install and deploy commands don’t work.
The plugin will be assembled at releng/sailpoint.IIQ_Deployment_Accelerator.update/target/repository. If you are using Eclipse locally, you can point it straight at that directory as an update site. Otherwise, you can zip up that directory and give it to whoever needs the plugin.
Hey Mahesh. This plug-in is currently without a maintainer and is supported by community contributions. If you would like to try and generate the jar files yourself then the code is open source. If you would like to submit pull requests we are more than happy to merge them into the code base.
I have been working on the IIQDA, trying to fix all of the issues we have been having with it for years. If you would be interested in testing my updates I would love to send you the version with changes I have made.
Let me know if you can do that and I’ll be in touch.
This eclipse tool has several advantages over the vscode extension tool. This needs to be officially supported by SailPoint, I dont know why they dont. And also upgraded to support latest eclipse and jdk 11 to 17.
Hi. I’m basically the official support at this point. A bunch of changes have just been pushed to the “colab” repository over on Github. Please check them out and let me know what you find!
In the latest version over on Github, you can have a separate env.secret.properties file. This should NOT be checked in to source control and is used to store the ECLIPSE_URL, ECLIPSE_USER, etc.
Hey Keith, please rebase your changes from the latest in the official colab Github repository. My changes from months ago were finally merged in, and I’ve also been made administrator on the repository, so I can help shepherd future PRs through.
I have created a PR with my changes. I do see some merge conflicts exist but I cannot view the conflict or correct them. Feel free to schedule time with me to review.
Did you figure this out? I just ran it with a newer version of Maven on my local machine. I think it’s fine at this point to encourage users of the IIQDA to upgrade to later Java versions on their development environments. Nobody should have a strong JDK8 or JDK11 dependency in 2024…
Getting the below error when I’m trying to build the plugin. I’m new to this, any help would be really appreciated.
Thanks!
EDIT: Im currently using JDK 17 and MVN 3.9.6
[INFO] e[1mReactor Summary for IIQ_Deployment_Accelerator 4.0.4-SNAPSHOT:e[m
[INFO]
[INFO] IIQ_Deployment_Accelerator ......................... e[1;32mSUCCESSe[m [  0.262 s]
[INFO] sailpoint.IIQ_Deployment_Accelerator.core .......... e[1;32mSUCCESSe[m [ 22.096 s]
[INFO] sailpoint.IIQ_Deployment_Accelerator.IdentityIQ .... e[1;32mSUCCESSe[m [ 15.982 s]
[INFO] sailpoint.IIQ_Deployment_Accelerator.IdentityNow ... e[1;32mSUCCESSe[m [ 10.532 s]
[INFO] sailpoint.IIQ_Deployment_Accelerator.IdentityIQ.Plugins e[1;32mSUCCESSe[m [ 10.158 s]
[INFO] sailpoint.IIQ_Deployment_Accelerator.LogView ....... e[1;32mSUCCESSe[m [  6.363 s]
[INFO] sailpoint.IIQ_Deployment_Accelerator.bundles ....... e[1;32mSUCCESSe[m [  0.003 s]
[INFO] sailpoint.IIQ_Deployment_Accelerator.feature ....... e[1;32mSUCCESSe[m [  0.751 s]
[INFO] sailpoint.IIQ_Deployment_Accelerator.features ...... e[1;32mSUCCESSe[m [  0.006 s]
[INFO] sailpoint.IIQ_Deployment_Accelerator.site .......... e[1;32mSUCCESSe[m [  6.187 s]
[INFO] sailpoint.IIQ_Deployment_Accelerator.releng ........ e[1;32mSUCCESSe[m [  0.007 s]
[INFO] unit.testing ....................................... e[1;32mSUCCESSe[m [  6.943 s]
[INFO] sailpoint.IIQ_Deployment_Accelerator.testing ....... e[1;32mSUCCESSe[m [  0.006 s]
[INFO] uitesting .......................................... e[1;32mSUCCESSe[m [  0.004 s]
[INFO] uitesting-eclipse .................................. e[1;31mFAILUREe[m [  6.485 s]
[INFO] e[1m------------------------------------------------------------------------e[m
[INFO] e[1;31mBUILD FAILUREe[m
[INFO] e[1m------------------------------------------------------------------------e[m
[INFO] Total time:  01:54 min
[INFO] Finished at: 2024-07-12T12:21:03+05:30
[INFO] e[1m------------------------------------------------------------------------e[m
[DEBUG] [613bd7f1-ea00-4976-9f79-5eeeaf00909b][extension>org.eclipse.tycho:tycho-maven-plugin:4.0.5] Searching bundle for class class org.eclipse.equinox.internal.p2.engine.SimpleProfileRegistry and location file:/C:/Users/AroraA3/.m2/repository/org/eclipse/platform/org.eclipse.equinox.p2.engine/2.9.0/org.eclipse.equinox.p2.engine-2.9.0.jar
[DEBUG] [613bd7f1-ea00-4976-9f79-5eeeaf00909b][extension>org.eclipse.tycho:tycho-maven-plugin:4.0.5] Return bundle org.eclipse.equinox.p2.engine for location file:/C:/Users/AroraA3/.m2/repository/org/eclipse/platform/org.eclipse.equinox.p2.engine/2.9.0/org.eclipse.equinox.p2.engine-2.9.0.jar
[DEBUG] [613bd7f1-ea00-4976-9f79-5eeeaf00909b][extension>org.eclipse.tycho:tycho-maven-plugin:4.0.5] Searching bundle for class class org.eclipse.equinox.internal.p2.engine.ProfileRegistryComponent and location file:/C:/Users/AroraA3/.m2/repository/org/eclipse/platform/org.eclipse.equinox.p2.engine/2.9.0/org.eclipse.equinox.p2.engine-2.9.0.jar
[DEBUG] [613bd7f1-ea00-4976-9f79-5eeeaf00909b][extension>org.eclipse.tycho:tycho-maven-plugin:4.0.5] Return bundle org.eclipse.equinox.p2.engine for location file:/C:/Users/AroraA3/.m2/repository/org/eclipse/platform/org.eclipse.equinox.p2.engine/2.9.0/org.eclipse.equinox.p2.engine-2.9.0.jar
[DEBUG] [613bd7f1-ea00-4976-9f79-5eeeaf00909b][extension>org.eclipse.tycho:tycho-maven-plugin:4.0.5] Searching bundle for class interface org.eclipse.equinox.p2.core.IProvisioningAgent and location file:/C:/Users/AroraA3/.m2/repository/org/eclipse/platform/org.eclipse.equinox.p2.core/2.10.200/org.eclipse.equinox.p2.core-2.10.200.jar
[DEBUG] [613bd7f1-ea00-4976-9f79-5eeeaf00909b][extension>org.eclipse.tycho:tycho-maven-plugin:4.0.5] Return bundle org.eclipse.equinox.p2.core for location file:/C:/Users/AroraA3/.m2/repository/org/eclipse/platform/org.eclipse.equinox.p2.core/2.10.200/org.eclipse.equinox.p2.core-2.10.200.jar
[ERROR] Failed to execute goal e[32morg.eclipse.tycho:tycho-packaging-plugin:4.0.5:package-plugine[m e[1m(default-package-plugin)e[m on project e[36muitesting-eclipsee[m: e[1;31mError assembling JARe[m: invalid header field (line 6) -> e[1m[Help 1]e[m
org.apache.maven.lifecycle.LifecycleExecutionException: Failed to execute goal e[32morg.eclipse.tycho:tycho-packaging-plugin:4.0.5:package-plugine[m e[1m(default-package-plugin)e[m on project e[36muitesting-eclipsee[m: e[1;31mError assembling JARe[m
	at org.apache.maven.lifecycle.internal.MojoExecutor.doExecute2(MojoExecutor.java:333)
	at org.apache.maven.lifecycle.internal.MojoExecutor.doExecute(MojoExecutor.java:316)
	at org.apache.maven.lifecycle.internal.MojoExecutor.execute(MojoExecutor.java:212)
	at org.apache.maven.lifecycle.internal.MojoExecutor.execute(MojoExecutor.java:174)
	at org.apache.maven.lifecycle.internal.MojoExecutor.access$000(MojoExecutor.java:75)
	at org.apache.maven.lifecycle.internal.MojoExecutor$1.run(MojoExecutor.java:162)
	at org.apache.maven.plugin.DefaultMojosExecutionStrategy.execute(DefaultMojosExecutionStrategy.java:39)
	at org.apache.maven.lifecycle.internal.MojoExecutor.execute(MojoExecutor.java:159)
	at org.apache.maven.lifecycle.internal.LifecycleModuleBuilder.buildProject(LifecycleModuleBuilder.java:105)
	at org.apache.maven.lifecycle.internal.LifecycleModuleBuilder.buildProject(LifecycleModuleBuilder.java:73)
	at org.apache.maven.lifecycle.internal.builder.singlethreaded.SingleThreadedBuilder.build(SingleThreadedBuilder.java:53)
	at org.apache.maven.lifecycle.internal.LifecycleStarter.execute(LifecycleStarter.java:118)
	at org.apache.maven.DefaultMaven.doExecute(DefaultMaven.java:261)
	at org.apache.maven.DefaultMaven.doExecute(DefaultMaven.java:173)
	at org.apache.maven.DefaultMaven.execute(DefaultMaven.java:101)
	at org.apache.maven.cli.MavenCli.execute(MavenCli.java:906)
	at org.apache.maven.cli.MavenCli.doMain(MavenCli.java:283)
	at org.apache.maven.cli.MavenCli.main(MavenCli.java:206)
	at java.base/jdk.internal.reflect.NativeMethodAccessorImpl.invoke0(Native Method)
	at java.base/jdk.internal.reflect.NativeMethodAccessorImpl.invoke(NativeMethodAccessorImpl.java:77)
	at java.base/jdk.internal.reflect.DelegatingMethodAccessorImpl.invoke(DelegatingMethodAccessorImpl.java:43)
	at java.base/java.lang.reflect.Method.invoke(Method.java:568)
	at org.codehaus.plexus.classworlds.launcher.Launcher.launchEnhanced(Launcher.java:283)
	at org.codehaus.plexus.classworlds.launcher.Launcher.launch(Launcher.java:226)
	at org.codehaus.plexus.classworlds.launcher.Launcher.mainWithExitCode(Launcher.java:407)
	at org.codehaus.plexus.classworlds.launcher.Launcher.main(Launcher.java:348)
Caused by: org.apache.maven.plugin.MojoExecutionException: Error assembling JAR
	at org.eclipse.tycho.packaging.PackagePluginMojo.createPluginJar(PackagePluginMojo.java:293)
	at org.eclipse.tycho.packaging.PackagePluginMojo.execute(PackagePluginMojo.java:184)
	at org.apache.maven.plugin.DefaultBuildPluginManager.executeMojo(DefaultBuildPluginManager.java:126)
	at org.apache.maven.lifecycle.internal.MojoExecutor.doExecute2(MojoExecutor.java:328)
	... 25 more
Caused by: java.io.IOException: invalid header field (line 6)
	at java.base/java.util.jar.Attributes.read(Attributes.java:413)
	at java.base/java.util.jar.Manifest.read(Manifest.java:290)
	at java.base/java.util.jar.Manifest.<init>(Manifest.java:100)
	at java.base/java.util.jar.Manifest.<init>(Manifest.java:76)
	at org.eclipse.tycho.packaging.PackagePluginMojo.getManifest(PackagePluginMojo.java:335)
	at org.eclipse.tycho.packaging.PackagePluginMojo.createPluginJar(PackagePluginMojo.java:279)
	... 28 more
[ERROR]
[ERROR]
[ERROR] For more information about the errors and possible solutions, please read the following articles:
[ERROR] e[1m[Help 1]e[m http://cwiki.apache.org/confluence/display/MAVEN/MojoExecutionException
[ERROR]
[ERROR] After correcting the problems, you can resume the build with the command
[ERROR]   e[1mmvn <args> -rf :uitesting-eclipse
Hello @drosenbauer, nice article you have here. I managed to install the plug-in in a different way but I have issue with french characters despite UTF-8 being configured everywhere I think is necessary. Char are displayed correctly in Eclipse and in the xml per se but when I open the rule in identityIQ it displays ? instead of é or à, etc.
Do you have an idea on how to fix this?
My colleague used the same installation way and it not having this issue.