Track 01 · Identity Workflows
In this mini hack, you will turn an identity event into a message. You will stand up an authoritative source and finish a partly built Workflow Studio workflow that wakes up the moment a new identity appears in SailPoint Identity Security, looks up who that person reports to, and emails a formatted onboarding notice — with the new hire's actual department, title, and manager in it. No CLI, no local install, and nothing to deploy.
Nothing here is simulated. You create the source, the trigger is a genuine SailPoint Identity Security event, the identity is one you create yourself by loading a row into an HR feed, and the email lands in your own inbox, which is what you show a developer advocate at the end.
You will need: a browser, the mini hack tenant's admin credentials, and access to your email.
Files you need
workflows-hack-day-schema.csv— the account schema. One line, twelve column names, no data.hr-feed.csv— the eight baseline employees. Twelve columns wide.
What you are building
  You append a row          SailPoint Identity Security creates the         Your workflow fires
  to the HR feed CSV  --->  identity during   --->  on idn:identity-created
  and aggregate             identity refresh
                                                               |
                                                               v
                                                     +------------------+
                                                     | Wait             |  <- pre-built
                                                     +---------+--------+
                                                               |
                                                               v
                                                     +------------------+
                                                     | Get New Hire     |  <- pre-built
                                                     +---------+--------+
                                                               |
                                                               v
                                                     +------------------+
                                                     | Get Manager      |  <- pre-built
                                                     +---------+--------+
                                                               |
                                                               v
                                                     +------------------+
                                                     | Send Email       |  <- YOU BUILD
                                                     | -> your inbox    |     THIS ONE
                                                     +---------+--------+
                                                               |
                                                               v
                                                       an email you can
                                                       show a developer advocate
You are building one step in the workflow and creating an authoritative source. That sounds small, but it is the step where two systems that know nothing about each other have to be made to agree — which is most of what integration work actually is.
What is already in your tenant
| Thing | Name | Where to find it | What it is for |
|---|---|---|---|
| Reference source | Workflows Mini Hack HR Feed | Admin → Connections → Sources, then open it by name | A finished, working version of the authoritative source you are about to build. Open it when you want to check your own work against something known-good. |
| Reference identities | 8 of them | Admin → Identities, then search a name — try Margaret Hamilton | Ada Byron, Grace Hopper, Jean Bartik and friends, created by the reference source. Their identity ids are the real ids you test with in step 7. |
| Template workflow | Workflows Mini Hack Template | Admin → Workflows, then open it | Trigger configured, three steps built, disabled, with real execution history. You read it, copy it, and edit the copy. |
Please do not edit any of the three templates. Everyone will be pointed at the same three objects. A schema upload replaces a schema; an aggregation replaces every account; a saved workflow edit is immediate. One person editing shared objects breaks the exercise for everybody else, which is exactly why you are building your own copies.
Everything else, you build:
| You will create | Name it | Built in |
|---|---|---|
| A delimited-file source | <your name> HR Feed | Step 1 |
| An identity profile | <your name> HR Feed | Step 4 |
| A workflow | <your name> Identity Onboarding | Step 6 |
Please add your name to all three. You will be working in a shared tenant, and this will make the checking process easier for everyone!
Two items are worth opening before you start, because the workflow depends on them and it's important to understand how they are used before moving forward:
- Open
Margaret Hamiltonunder Admin → Identities. Her Manager field shows Jean Bartik as a link, not as the textjean.bartik. That link is what makes the manager lookup in your workflow possible — it exists because the identity profile resolved auidfrom the CSV into a pointer at a real person. - Open the source's
Accountslist, under Account Management. Click on themargaret.hamiltonaccount to see the details and notice thatmanagerUidis just a string readingjean.bartik. Accounts hold text; identities hold references. That difference comes up again in step 1.
Work through the steps in order. You build one step, and each stage is testable on its own before you move to the next. If a step leaves you stuck, open the hint under it to unblock yourself and keep moving.
1. Build your own HR feed
These four steps will walk you through creating an HR source to test and build your workflow on. You will initially have eight identities that know who they report to. Each step is checkable on its own — do not move on until each check passes, because everything downstream depends on it.
1. Create your own delimited-file source
Go to Admin → Connections → Sources and click Create New in the upper right-hand corner. Search the connector list for Delimited File and click Configure. Inside the creation window, you will add the following information:
| Field | Value |
|---|---|
| Source Name | <your name> HR Feed |
| Description | Anything. Navigate Workflows mini hack is fine. |
| Source Owner | hack.day — start typing it and pick it from the list |
| Platform Type | Saas |
The rest of the optional values can be left blank.
Click Continue. You now have an empty source where you will add your employees.
Why a delimited file? Because it is the shortest path to a real authoritative source. There is no system on the far end, no credentials, and no network call — you upload a CSV, and SailPoint Identity Security treats it as the complete, current truth about a population of people. Every identity in this exercise arrives because you put a line in a text file, just like how many HR feeds work.
Why hack.day as the owner? A source owner is the person accountable for the source, as required by
SailPoint Identity Security. Using the shared account in this tenant keeps every source attributable to the event rather than
to whoever clicked Create.
Check before moving on: your source appears in Admin → Connections → Sources with your name in it, and opening it shows an account count of zero.
2. Upload the account schema
Open your source and go to Account Management → Account Schema in the left-hand column. Click
Upload Schema in the top-right corner and upload workflows-hack-day-schema.csv.
After uploading, a pop-up will ask for attributes to represent the Account ID and the Account name. Set them both to uid.
Looking at this file, there is not a lot to it:
employeeId,uid,firstname,lastname,fullName,email,department,jobTitle,managerUid,location,startDate,lifecycleState
A schema file for a delimited source is nothing but the header row — the names of the columns your CSV will have.
Why upload a schema at all, separately from the data? Because a CSV on its own has no structure that SailPoint Identity Security can rely on. The schema is the contract: these twelve attributes exist, they are called exactly this, and one of them identifies an account.
3. Set up manager correlation
The schema now tells SailPoint Identity Security that a column called managerUid exists. It does not tell SailPoint Identity Security that the column
means anything — as far as the platform is concerned, it is one more string, no different from
location. We need to let SailPoint Identity Security know the values associated with the columns.
In your source on the left-hand column, go to Account Management → Account Correlation and scroll down to Manager Correlation. Set:
| Field | Value |
|---|---|
| Identity Attribute | Name |
| Account Attribute | managerUid |
Click Save.
Identity Attribute is Name, not Manager and not uid. You are choosing the attribute to match on the manager's side of the
relationship that will equal jean.bartik, for example.
4. Aggregate the eight baseline accounts
Download hr-feed.csv and do not edit it yet. The file should contain eight rows,
one per baseline employee.
In your source, go to Account Management → Account Aggregation on the left-hand column and drag and drop the file into the Import Accounts section. The aggregation will start automatically, and you can watch the progress of the aggregation in Latest Account Aggregation on the same page.
5. Create your identity profile and map the attributes
Accounts are not identities. An account is a row on a source; an identity is the person SailPoint Identity Security governs, and an identity profile is the thing that turns the former into the latter. You now need to produce identities.
Go to Admin → Identity Management → Identity Profiles and click Create New. You will add the following information in the pop-up window:
| Field | Value |
|---|---|
| Name | <your name> HR Feed |
| Authoritative Source | your source from step 1 |
Click Create, then open the Mappings tab. For each identity attribute, you choose which account attribute it reads from. Update only these mappings; you can leave the rest alone. Be sure to choose your source with your name from the Source column in every row you update:
| Identity attribute | Account attribute |
|---|---|
| Username (uid) | uid |
| Work Email | email |
| Family Name | lastname |
| Given Name | firstname |
| Department | lastname |
| Display Name | uid |
| Job Title | jobTitle |
| Manager Name | managerUid |
Scroll to the bottom of the page and click Save, then click Apply Changes in the top-right corner.
6. Verify the reference resolved
This is the checkpoint for all of Part 1, where you confirm your aggregation and mappings are correct.
Go to Admin → Sources → Your Source → Account Management → Accounts and look at Margaret Hamilton. There
should be two hyperlinks with her username; click on the hyperlink under the Identity column. Look at her Manager
field. It should read jean.bartik, as a clickable link to Jean's identity. Without the manager correlation, your workflow
has a name it can print but cannot fetch.
See details: the Manager field is blank
- Have identities finished processing? The resolution runs during identity refresh, not on save. Give it a minute and reload.
- Is Manager Correlation configured on your source? Account Correlation → Manager Correlation,
set to
Name←managerUid, and save. - Is Manager mapped to
managerUidin your identity profile? Open the Mappings tab and confirm. Mapping it tomanager,employeeId, or leaving it unmapped all produce a blank field. - Is
uidmapped touidin your identity profile? Manager Correlation matches against the identity'sName, which comes fromuid. If that mapping is missing or points elsewhere, there is nothing forjean.bartikto match. - Did you open the right Margaret? There may be multiple in this tenant. The one on the reference source will look correct no matter what you have misconfigured on yours.
Ada Byron, Katherine Johnson, and Mary Jackson have a blank managerUid in the CSV — they sit at the
top of the org chart. Their identities will not have a manager.
2. A tour of the template workflow
Part 1 gave you a population of people who know who they report to. Part 2 turns an arrival into a message. Before you build anything, spend a few minutes understanding what this workflow does.
A workflow, in this platform, is two things: a trigger that decides when it runs, and an ordered chain of steps that run when it does. There is no code. Each step is a pre-built action you configure by filling in fields, and each one can read the output of any step before it.
Finding the workflow
Go to Admin → Workflows. You will see Workflows Mini Hack Template with a status of
Disabled. Open it, then click Edit in Builder to open it in the builder. This will
be the template you will create a copy of later.
Why it is disabled. A disabled workflow is not subscribed to its trigger. Real
idn:identity-created events will fire in this tenant while you work, and they will pass this
workflow by without running it.
Test Workflow runs on demand regardless of the status, so you can execute this as often as you like while it is disabled, reading real output the whole time. You flip it to Enabled in step 4, once it works — and only then does a real joiner set it off.
The canvas
Open the workflow, then click the Edit in Builder button in the top-right header.
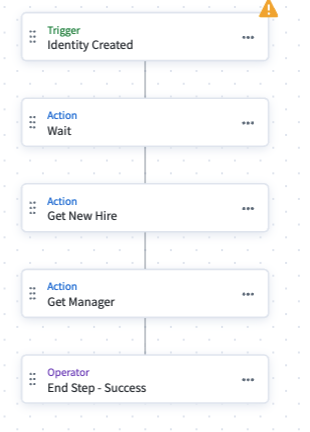
The five nodes, top to bottom, are: the trigger, Wait, Get New Hire, Get Manager, and an End step.
Two things to note about the shape of this workflow. Every step points at the next one, and the last step points at an End Step, which is what tells the platform the run finished successfully.
Your work goes between Get Manager and the End Step. Everything above that is a working example
of one pattern.
The trigger
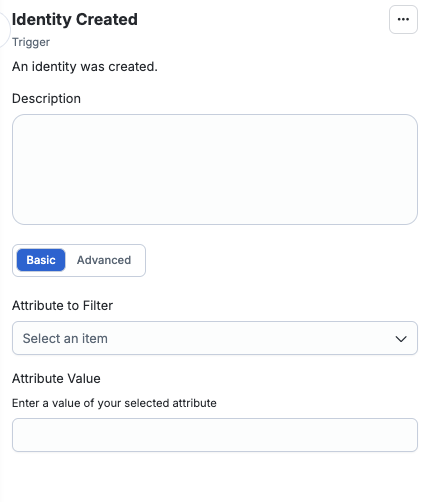
A trigger answers "when should this run?" Every workflow has exactly one trigger, and without it a workflow is just a list of steps. There are three kinds: scheduled (i.e. every night at 2 am), external (something POSTs to a URL to start it), and event (the platform itself tells you something happened).
This one is an event trigger on Identity Created, which is the event the platform publishes the instant a new identity is created. That choice is what makes this a joiner workflow rather than a report: nobody schedules it, nobody calls it, and it cannot run unless a real person genuinely arrived.
The filter field is empty. A filter is an expression the platform evaluates on the event before your workflow is invoked — events that fail it never reach you at all. Empty filters mean every identity creation in this tenant reaches your workflow, and SailPoint Identity Security may warn you about that. It is fine here, because the only identities ever created in your tenant come from the HR feed.
The Wait step
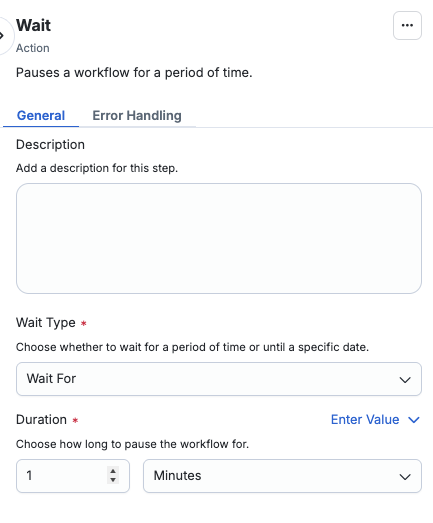
A Wait step pauses the run. The run holds at this point for the duration you set, then continues.
We wait 1 minute to give the identity time to fully process. The identity profile populates attributes and correlates the manager during the same refresh that creates the identity, so a lookup that runs the instant the event arrives can return less than the finished record. One minute is comfortably enough, and it costs you nothing here.
Get New Hire
Get New Hire is a Get Identity action that was renamed.
Get Identityis a built-in action. Give it one identity id, it calls the platform's identity API, and it hands back that identity's full record — every attribute the platform holds, not just the few the event carried.- The name is yours to choose.
Get New Hiredescribes the role this lookup plays in this workflow. Two steps in this workflow are the same action doing different jobs, and naming them for their job is what keeps your workflow readable. - Its input is a variable, not a fixed value. The identity-id field reads
$.trigger.identity.id— "the id of the identity this event was about." Every run applies to a different person.
How it applies here: This step is how they get into the workflow. The event says who; this looks up everything about them.
The variable picker
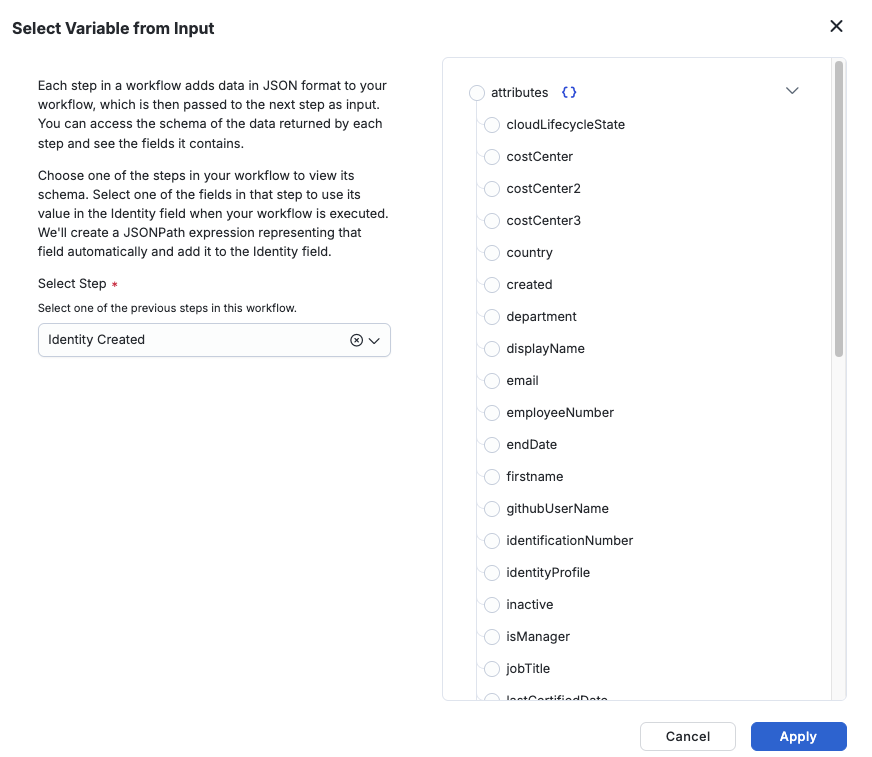
This is how data moves between steps. Any field that accepts a variable has this control, and it lists everything available at that point in the flow — the trigger's payload, plus the output of every step above the one you are editing. Pick a value and it writes the path for you.
It's worth noting that a step can only see steps above it, which is why order matters. And the path it writes refers to a step by an internal name that is not always its display name.
Get Manager
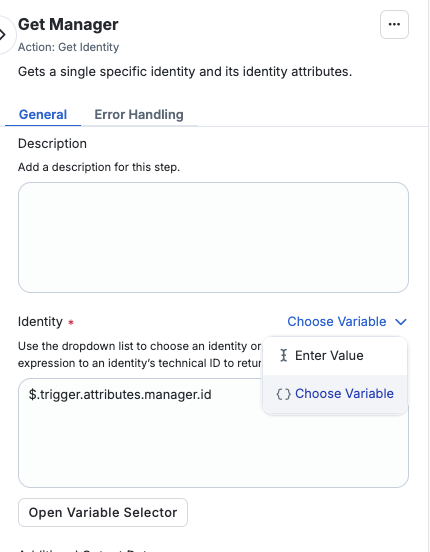
The same Get Identity action a second time, renamed for its job, with one difference: its input comes from Get New Hire's output rather than the
trigger. Specifically managerRef.id — the manager's identity id, taken off the record the previous
step fetched.
Why a second lookup at all? Because the new hire's record does not contain their manager. It contains a reference to their manager — an id and a name — in the same way a row in a database holds a foreign key rather than the whole related row. To put the manager's real name and email address in your email, this step fetches that second person.
How it applies here: two of your six required values come from here. Step 1 explains why it reads managerRef.id and not the similar-looking field beside it.
Execution history
Click Back in the top-left corner and then Executions in the left hand column. Every time a workflow runs, it leaves a record here — what triggered it, when, whether it succeeded, and what every step did. This is where you go when something did not work.
There is already one example run in here. You will borrow a payload from this run in step 2.
Inside a single run
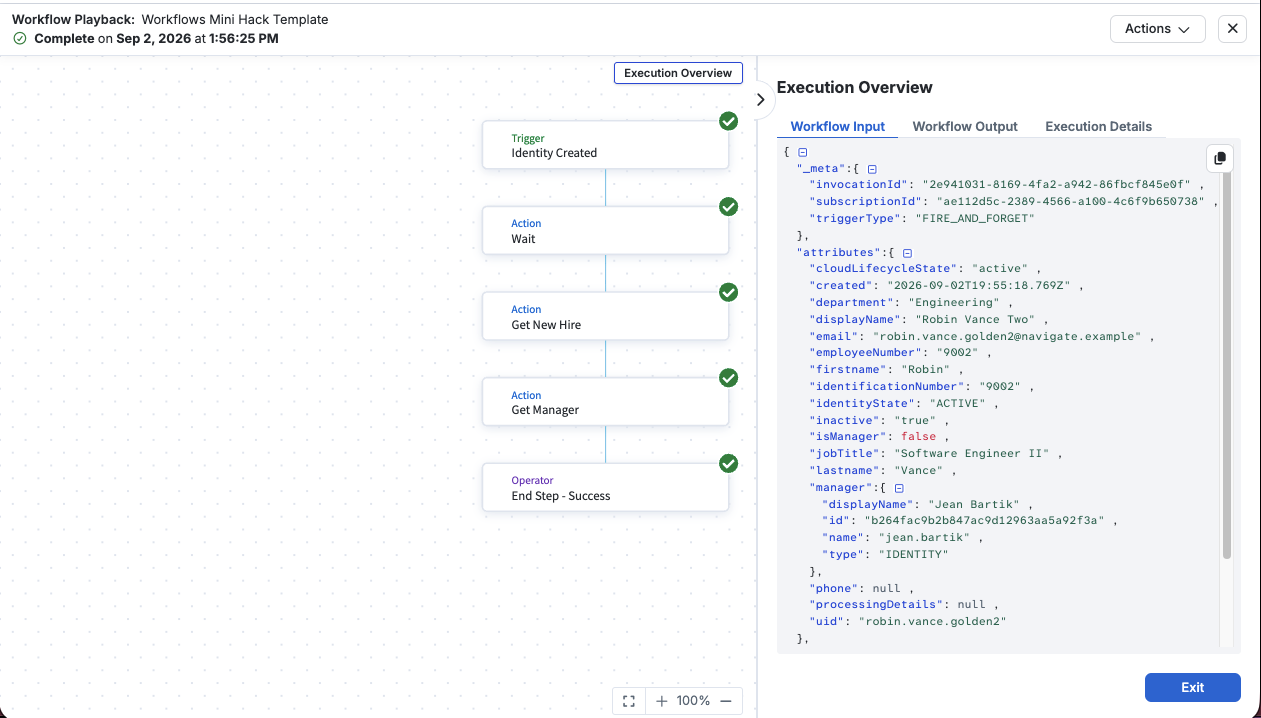
Click Actions → View Execution, then any step inside it, to see exactly what that step received and what it returned. This panel is the most useful debugging tool in Workflow Studio — it shows you what your workflow actually sent.
What the event actually hands you
Inside the workflow playback, click the trigger, then look at what the event gives you. This is a real payload, captured from a real identity creation in a tenant just like yours:
{
  "_meta":{
    "invocationId": "1e9dfacc-9e9e-4048-a922-06a8740261c3" ,
    "subscriptionId": "bede1adf-39c9-47aa-b34f-c9996c807d5e" ,
    "triggerType": "FIRE_AND_FORGET"
  },
  "attributes":{
    "created": "2026-09-29T14:01:06.654Z" ,
    "displayName": "radia.perlman" ,
    "email": null ,
    "employeeNumber": null ,
    "firstname": null ,
    "inactive": "true" ,
    "isManager": false ,
    "lastname": null ,
    "manager": null ,
    "phone": null ,
    "processingDetails": null
  },
  "identity":{
    "id": "8e84fa10ab3641d9bf5d7f1293c0b772" ,
    "name": "radia.perlman" ,
    "type": "IDENTITY"
  }
}
Why you fetch the details after the trigger
Inside the workflow playback, click Get New Hire, and read its output panel next to the payload above.
Same person. One has department, jobTitle, a real displayName, and a manager reference.
Treat the event as a notification rather than as a data feed. It tells you that something happened and it hands you an id, and the full record is one lookup away. The fetched record is complete and it carries the manager reference the payload doesn't have.
The two manager fields
Now click Get Manager and look at where its id comes from in the input panel. Then look back at Get New Hire's
output, where you will find two different manager fields:
| Field | Holds | Useful for a lookup? |
|---|---|---|
attributes.manager | The string alan.turing — a uid | No. It is a name, not an id. |
managerRef | { "id": "...", "name": "alan.turing" } | Yes. managerRef.id is an identity id. |
Get Identity needs an id, so only managerRef.id works. That distinction — a reference to a person
versus a string that names them — is the same one that runs through this whole exercise.
2. Copy the template into your own workflow
Now that you have explored the workflow template, it's time to create your own!
Click the X in the top-right corner of the workflow playback until you get to the main workflows page.
Find the Workflows Mini Hack Template in the list. Use the actions menu on it and choose Duplicate.
Be sure to insert your name into the name of the workflow.
See details: the template workflow is not in your tenant or invalid
If Workflows Mini Hack Template is missing or invalid, build the workflow yourself from the file below.
workflows-hack-day-template.json — the template workflow, with the trigger and all three steps in it. Download it first.
- Go to Admin → Workflows and click New Workflow.
- Click Upload File and upload the file you downloaded above.
- Name it
<your name> Identity Onboarding. - Click Continue to Builder. The canvas must show the trigger, Wait, Get New Hire, Get Manager, and an End step.
A workflow you build this way has no execution history, so you have no captured payload to test with. Step 3 tells you to copy a payload from the template run. Instead, take the id of one of the eight baseline identities from Admin → Identities and put it in a payload of your own, in the shape of the example payload above.
Open your copy and confirm three things:
- It is Disabled.
- Its execution history is empty — it has never run.
- Its canvas has the same five nodes as the template: trigger, Wait,
Get New Hire,Get Manager, End.
Everything from here on happens in your copy. If you catch yourself editing Workflows Mini Hack Template,
stop, close it, and reopen yours — check the name in the header before you type.
Copy the payload out of the template
Your copy has never run, so it has no execution history of its own to test with. The template does — that is the one example run you saw a moment ago, and you are about to use its payload to test.
- Open
Workflows Mini Hack Template→ Executions. - On the completed run, click Actions → View Execution.
- Click the trigger node and copy its input payload.
- Keep it on your clipboard, or paste it somewhere you can get at it again — you will reuse it every time you test.
3. Test it and read the output
Navigate back to the builder of your workflow copy and click Test Workflow. It asks for a trigger payload – this is where you will delete the pre-populated input and paste the payload you copied from the template run.
Do not use the default sample payload it offers you. That payload is SailPoint's documentation
example — John Doe, william.wilson, department: "Sales", uid: "E009" — and it will fail
immediately with 404 Not Found, because those identity ids do not exist in your tenant. It is also
fully populated, which makes it actively misleading about what a real event carries.
Run it. You are looking for three green steps, and two output panels worth reading:
Get New Hire— a full identity record. Note the exact paths todepartment,jobTitle, anddisplayName. You will need all three in the next step.Get Manager— a different human's record. Note the paths to theirdisplayNameand their email. If both panels show the same person, something is wired to the wrong id.
Use the variable picker. Anywhere a Workflow Studio field takes a variable there is an insert-variable control listing every value available at that point in the flow, including every preserved field of every earlier step. It writes the correct path for you. Guessing paths is the fastest way to get stuck here.
Test Workflow runs regardless of whether the workflow is enabled — so the entire build-and-iterate loop happens while the workflow is disabled and silent. You enable it once, at the end, when it works.
See details: what to check if the test fails
404 Not FoundonGet New Hire— you used the default sample payload. Be sure to get one from your own execution history or the template.expected top-level JSON object in string, got array without attribute wrapper— aGet Identitystep received an empty id. It does not error on that; it lists every identity in the tenant and then errors on the array.Find the lookup whose id expression resolved to an empty id.Get Managerfails, or returns nobody — the identity in your payload has no manager. Use a payload from one of the green setup runs.- Test Workflow grayed out — unsaved changes. Save, then test.
3. Add the step that sends the message
Navigate to the canvas of your workflow and add a Send Email action after Get Manager. It only requires
three inputs to work: a recipient, a subject, and a body.
Be sure to add an End step after the Send Email action. Every step must point at something, and your new step is now the
last one in the chain. Without an end, the workflow will not save or test, and the error you get is
Err: next is not defined naming your email step — which reads like your step is broken when
actually nothing follows it.
Configure it:
| Field | Value |
|---|---|
| Recipient Email Addresses | add your own email address |
| Subject | A new identity <displayName> has been created in SailPoint Identity Security |
| Body | see below |
The subject and the body read variables the same way. Write your text, and wrap the path in double braces where you want the value:
A new identity {{ $.getIdentity.attributes.displayName }} has been created in SailPoint Identity Security
Without the braces the path arrives in the email as literal text, so every value you insert needs its own pair.
Six things have to be in the message, and a developer advocate will check every one:
| # | Thing | Comes from |
|---|---|---|
| 1 | The new hire's display name, in the subject line | Get New Hire |
| 2 | The new hire's display name, in the body | Get New Hire |
| 3 | Their department | Get New Hire |
| 4 | Their job title | Get New Hire |
| 5 | Their manager's display name | Get Manager |
| 6 | Their manager's email address | Get Manager |
The subject matters because it is the first thing a developer advocate sees, and a subject that reads
New joiner: Robin Vance proves the workflow reached into a fetched record before it composed
anything.
A body shape to start from — word it however you want, but be sure to add these values:
A new identity has been created in SailPoint Identity Security.

  Name:        <displayName>
  Department:  <Department>
  Job title:   <Job Title>

  Reports to:  <Manager Display Name> (<Manager Email>)
Seven different things to add in this step: the recipient, the subject, and the five values in the body. One is your own email address, typed literally. The other six are variables, and every one of them comes out of a lookup rather than out of the trigger — which is the whole point of the three steps above yours.
Save. Test. Then check your inbox — a test run will send a real email. That is your iteration loop: edit, save, test, refresh your mail, repeat.
See details: the five failures worth recognizing on sight
The email arrives reading $.getIdentity.attributes.department. The path has no braces around it, so it
was sent as text. Wrap it: {{ $.getIdentity.attributes.department }}. This applies to the subject and the body
alike.
A value is blank. That field is genuinely empty on the record, or the path is incorrect. Open the run history, click the step, and read what it actually sent.
The manager's name is jean.bartik rather than Jean Bartik. You used attributes.manager or a
uid field. The manager's real name is on Get Manager's output, not on the new hire's record.
The step is green but no email arrives. Green means SailPoint Identity Security accepted and sent it. Check your spam or junk folder first. Then check the recipient address for a typo, by reading it out of the run history rather than out of the step config, so you see what was actually sent.
See details: the whole step, click by click
If you have been at this a while, here is the entire answer. Working through it and understanding it afterwards beats staring at a red step.
1. Add the step. On the canvas, use the + control directly below Get Manager and choose
Send Email. Adding it inline this way connects it on both sides; dropping it onto empty canvas
leaves it dangling.
2. Add an End step below it. Your email step is now the last real step, and it needs somewhere to
point. Skip this and you get Err: next is not defined naming your email step.
3. The recipient. Your own email address, typed literally. This is the only value in the step that is not a variable.
4. The subject. Literal text, with the path in double braces:
A new identity {{ $.getIdentity.attributes.displayName }} has been created in SailPoint Identity Security
5. The body. Every value is a path in double braces, exactly like the subject:
A new identity has been created in SailPoint Identity Security.

Name:        {{ $.getIdentity.attributes.displayName }}

Department:  {{ $.getIdentity.attributes.department }}

Job title:   {{ $.getIdentity.attributes.jobTitle }}

Reports to:  {{ $.getIdentity1.attributes.displayName }} ({{ $.getIdentity1.emailAddress }})
6. Where each path comes from, if the paths above do not match what your picker offers:
| Value | Step | Field to insert |
|---|---|---|
| New hire's name | Get New Hire | attributes.displayName |
| Department | Get New Hire | attributes.department |
| Job title | Get New Hire | attributes.jobTitle |
| Manager's name | Get Manager | attributes.displayName |
| Manager's email | Get Manager | emailAddress |
Build every path with the picker. Note that getIdentity is Get New Hire and getIdentity1 is
Get Manager — steps carry internal names that differ from their display names, which is why the
paths above don't look like the labels on your canvas.
7. Save, then Test Workflow with a payload from a green run in your execution history or the template.
8. Check your inbox. One email, six values in it, nothing reading [object Object]. If the run
went green and nothing arrived, check spam before anything else.
- Workflow action library — every action, with the inputs it takes
- Workflow operator library — the expression syntax behind the variable picker
4. Enable the workflow
Save, leave the builder, and flip the workflow from Disabled to Enabled.
Everything so far ran because you asked it to. A disabled workflow is invisible to the event bus —
idn:identity-created events have been firing in this tenant the whole time and yours ignored every
one. Enabling it is what subscribes it.
SailPoint Identity Security tracks consecutive failures per workflow and will disable a workflow that keeps failing, so one broken flow cannot generate errors forever. Enabled-and-broken is a state with consequences, and it gets turned off at a moment of its own choosing rather than yours.
5. Fire the real event
Time to add a person to this company!
- Open
hr-feed.csv. Eight baseline rows, twelve columns wide — the same file you loaded into your source during setup, so it already matches what is in there. - Append exactly one row, copying and pasting from an existing employee. Change at least:
uid— make it unmistakably yours and unique, e.g.robin.vance.yourname. Reusing an existinguidis the most common reason nothing happens.email— match the uidfullname— this becomes the identity's display name, so make it a real-looking namedepartmentandjobTitle— these end up in your email, so make them yoursmanagerUid— must exactly match theuidof one of the baseline rows.jean.bartikis a safe choice. Pick one of the three people with a blankmanagerUidandGet Managerwill fail.
- Upload the whole file to Admin → Connections → Sources →
Workflows Mini Hack HR Feed→ Account Aggregation.
Upload all nine rows, not just yours. A delimited-file aggregation is not an append — SailPoint Identity Security treats the file as the complete current state of the source, so anyone present last time and missing now is a deletion. Upload a one-row file and you are telling SailPoint Identity Security that eight people left the company.
Then wait, and check that each stage was ran:
| Stage | What happens |
|---|---|
| Aggregation | Your account arrives on the source |
| Identity refresh | The account becomes an identity — this is the moment your event fires |
| Your workflow | Waits a minute, then runs two lookups and sends your email |
Two places to watch: Admin → Identities for your new hire, and your workflow's execution history for a new run. Then check your inbox.
See details: nothing happened
- Is the workflow enabled? Step 4. Easy to skip.
- Did the aggregation actually succeed? Check Aggregation History. If it was canceled, you may have uploaded a partial file. Re-upload all nine rows.
- Does the identity exist? Search Admin → Identities. If the account aggregated but no identity
appeared, your row did not satisfy the identity profile — usually this means a missing
uidoremail. - Did you reuse a
uid? Auidthat already exists correlates to the existing identity and updates it. Updates are not creations, andidn:identity-createddoes not fire for them. Change theuidand upload again. - Is there a run in the execution history? If yes, the event fired and your workflow is what broke — open it and the failing step will tell you which. If no, the event never reached you; go back to 1–4.
- Have you waited long enough? Aggregation, then refresh, then a one-minute wait inside the workflow. Give it a few minutes before concluding anything.
6. Check your work
Show a proctor the email in your inbox. It should have:
- The new hire's display name in the subject line
- The new hire's display name in the body, matching the row you loaded
- The correct department
- The correct job title
- The manager's display name — not their
uid, not[object Object] - The manager's email address
And in your tenant:
- The workflow is Enabled
- Its execution history has a successful run for the new hire you created, triggered by a real
idn:identity-createdevent rather than by Test Workflow
7. Stretch goals
- Survive a missing manager. Add a condition before
Get Managerthat checks whethermanagerRef.idis populated, and route the no-manager case to a different message — "no manager on record, routing to HR" — instead of failing. Test it by loading a row with an emptymanagerUid. Then look at the three red runs sitting in your history from setup: Ada, Katherine, and Mary. You will have just fixed a bug that was there before you arrived. - Filter at the trigger. A filter is a JSONPath expression SailPoint Identity Security evaluates on the event before invoking your workflow. Events that fail it never reach you: no execution consumed, nothing in your history, nothing to fail. Add one so only one department's joiners reach the workflow, then load two rows in two departments and confirm only one email arrives — and only one run appears. Compare that with doing the same check as a condition step inside the workflow: same outcome, but the filtered version never ran at all.
- Route on department. Branch so Engineering joiners produce a different message, or go to a different recipient, than Finance joiners. This is where most real joiner workflows spend their complexity.
- Send it to the manager instead of yourself. You already have the manager's email address in
Get Manager's output — so use it as the recipient and rewrite the message as something Jean Bartik would actually want to read on her new report's first day. Every address involved is fictional, so nothing leaves the tenant. - Grant access, not just talk about it. Add a Manage Access action that assigns an access profile to the new hire, and name what it granted in your email. This is the line between notification and provisioning, and it is worth crossing once to see how short the step is.
- Put a human in the loop. Use a Create Form action to ask the manager to confirm the new hire's access before anything is granted, and have the workflow wait on the answer. The automation gathers context and drafts the decision; a person makes it.
- Tune the wait. The Wait step is set to one minute because that is comfortably enough. Find out
what is actually enough — drop it to fifteen seconds and see whether
managerRefis populated in time. You are measuring how long identity refresh takes to settle, which is a genuinely useful number to know about a tenant. - Swap the mail for an HTTP call. Replace Send Email with an HTTP Request step pointed at any endpoint that will accept JSON. This is the general-purpose escape hatch in Workflow Studio: any system reachable over HTTP is reachable from a workflow, with no connector and no code. It is also where the real integration pain lives — auth headers, body shapes, and error codes that tell you nothing.
- Make it fail on purpose. Break the step deliberately — a malformed recipient, or an HTTP Request at a URL that returns 500 — and read what the run history shows you. Then find where consecutive-failure handling lives and read what SailPoint Identity Security will do to your workflow if you leave it that way.
Documentation
The feed — sources, schemas, and identity profiles
- Transforms — the identity profile Mappings tab in depth, including
how to compute an attribute rather than copy one straight across. Start here if you want a
displayNamebuilt from other columns instead of read fromfullName. - Create Source — step 1 as an API call, and the full list of fields a source actually has
- Upload Source Accounts Schema Template — step 2, and the shape of the schema SailPoint Identity Security builds from your header row
- Account Aggregation — the aggregation upload from steps 3 and 10
- Create Identity Profile — step 4, including how mappings are represented underneath the UI
- Account Aggregation Completed — the other event in this story. Your workflow fires per identity; this one fires once per aggregation.
The workflow — triggers, testing, and actions
- Event triggers — what an event trigger is and how to use one
- Trigger types — scheduled, external, and event
idn:identity-createdpayload reference — every field the event carries, and every field it does not- Filtering events — the expression syntax behind the filtering stretch goal
- Testing triggers — testing an event-driven integration without waiting for a real event
- Workflow action library — what Get Identity, Send Email, Manage Access, and Create Form each take and return
- Workflow operator library — the expression syntax behind the variable picker
- Workflows API — read, create, and version workflows as JSON
- Workflows CLI — list, export, and manage workflows from a terminal
Still stuck?
Grab a SailPoint employee in the room, or reach for the community and tooling.