Service Accounts
Service Accounts
Service accounts are identities in Identity Security Cloud (ISC) that aren't real people. Their purpose is to provide credentials for automation services that can be managed and controlled separately from real identities. As a developer of integrations with ISC, there are two main advantages of creating service accounts: you can scope access to the least privilege necessary to do the job, and you can ensure that your integration's access doesn't end when you leave your organization. If you use your user account to generate credentials for integrations, they are tied to your level of access (i.e. admin) and can be revoked when you leave the organization - this could cause downtime in your integrations.
Read this guide to learn how to create service accounts and implement them.
Implementing service accounts
Any authoritative source can be used to create and manage service accounts, with Active Directory (AD) being a likely choice. Using AD to create service accounts is advantageous because doing so provisions your service accounts with unique email addresses that can be used to log in to ISC as the service account. However, if you don't want to create service accounts by using AD, you can use a flat file source to create and manage your accounts.
Create a delimited file source
This section describes the process of configuring your flat file source to manage service accounts.
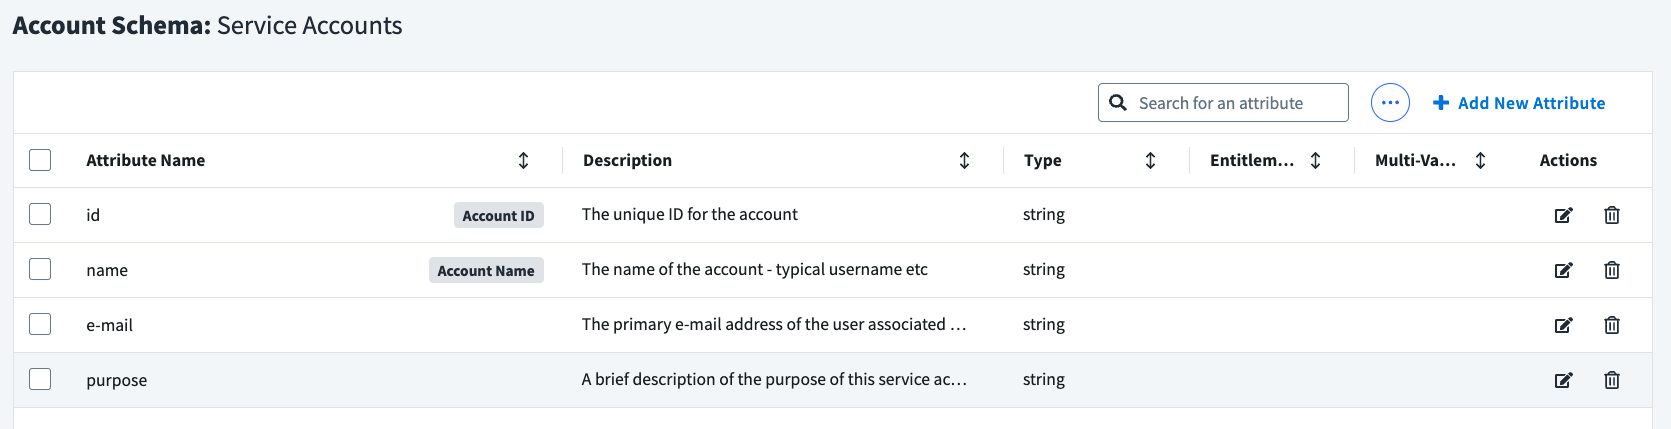
Create a new delimited file source and name it 'Service Accounts'. Then navigate to the 'Account Schema' section and modify the schema as follows. You can add additional attributes if you want, but these four are good to start with:
Creating service accounts
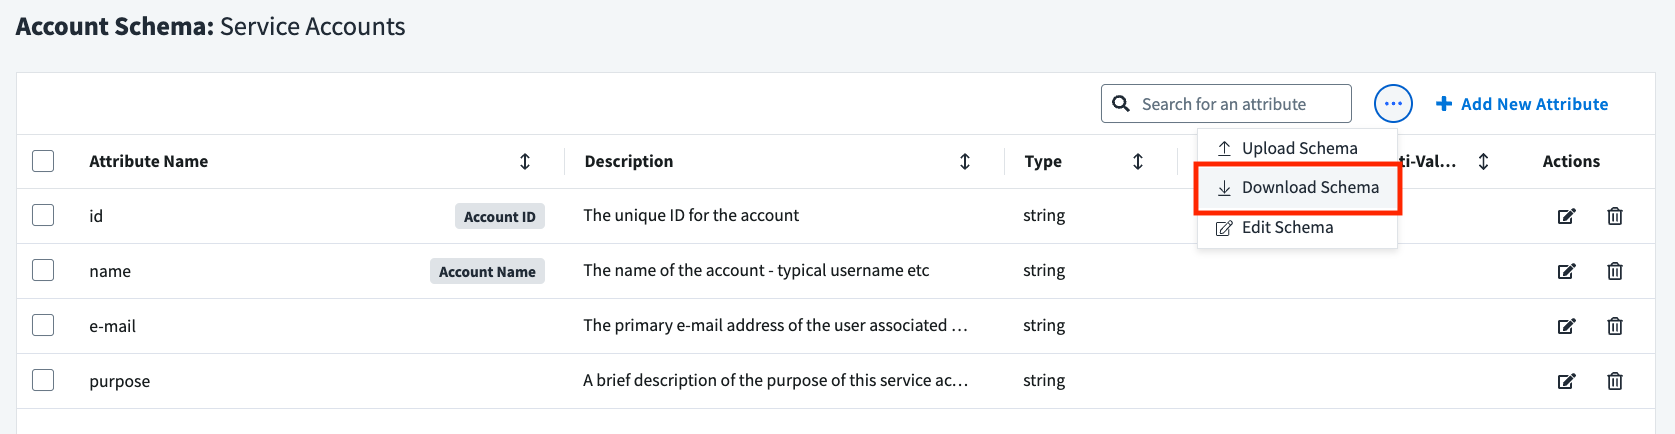
To create a service account, you must export the account CSV file and add a new row for each account you want. Start by downloading the accounts CSV file.
Then open the CSV and add a new service account:
- Set the
idto a unique value that won't be duplicated anywhere in this file (ex.SA-001). - Set the
nameto quickly describe the account's purpose (ex.audit01). - Set the
e-mailto a valid email address that you have access to. This is important - you will receive the ISC invite as an email to set the password and login as the service account. This can be your email address or any other email address you have access to (ex[email protected]). You can also reuse this email address as many times as you want. - Set the
purposeto a brief description of what this account is used for. This can help you identify accounts later on when you need to manage and delete old accounts (ex.Automate monthly audit report).
Save the CSV and upload it to your source from the 'Import Accounts' tab.
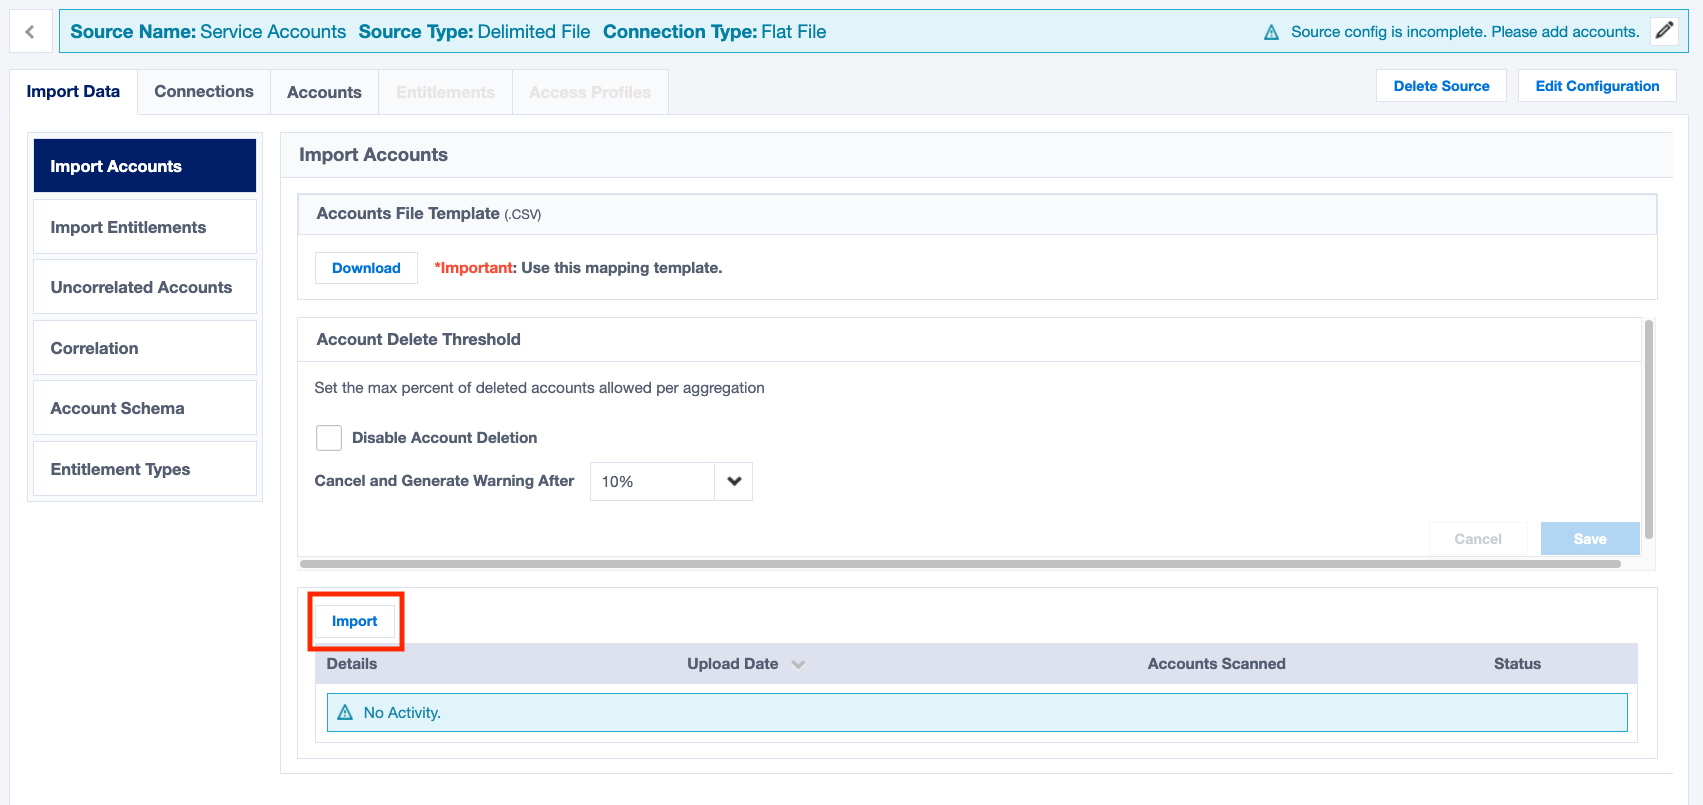
If it's successful, you will see one account imported.

Creating service accounts via API
Alternatively, this can also be done using the ISC API:
- Get the Source ID of the previously-created source you'd like to add an account to, either from the URL when you browse to the source in the UI, or by calling the list sources endpoint.
- Call the List Accounts endpoint to retrieve all existing accounts in that particular source, using the
filterparameter to specify the ID of the source you want to add an account to (`sourceId eq "xxxxxxxxxxxxxxxxxxxxxxxxxxxxxxxx"). - Using the
attributeshash table from one of the accounts returned as a reference, craft a suitable body for aPOSTcall to the create account endpoint. Note: in addition to the source-specific attributes, you'll also need to include thesourceIdattribute, and remove theidNowDescriptionattribute.
If your call is successful, you should get a 202 Accepted response with a response body showing the new account's ID.
Make the source authoritative
The service account source must be authoritative to be able to create new identities for each service account. This will allow you to log in as the service account to generate access tokens.
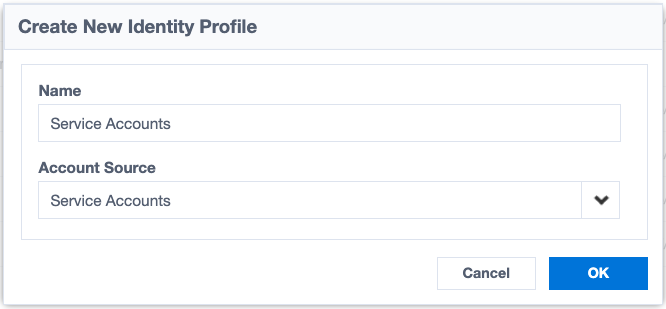
To make the service account source authoritative, you must create a new identity profile and link it to your source.
To start, create a new identity profile named "Service Accounts" that is linked to your Service Accounts source.
Configure the identity profile as you want. Once it's configured, go to the 'Mappings' tab to set up the identity attribute mappings as follows:
- Set
SailPoint User Nameto thenameattribute. - Set
Work Emailto thee-mailattribute. - Set
Last Nameto thenameattribute. - Set
First Nameto thenameattribute.
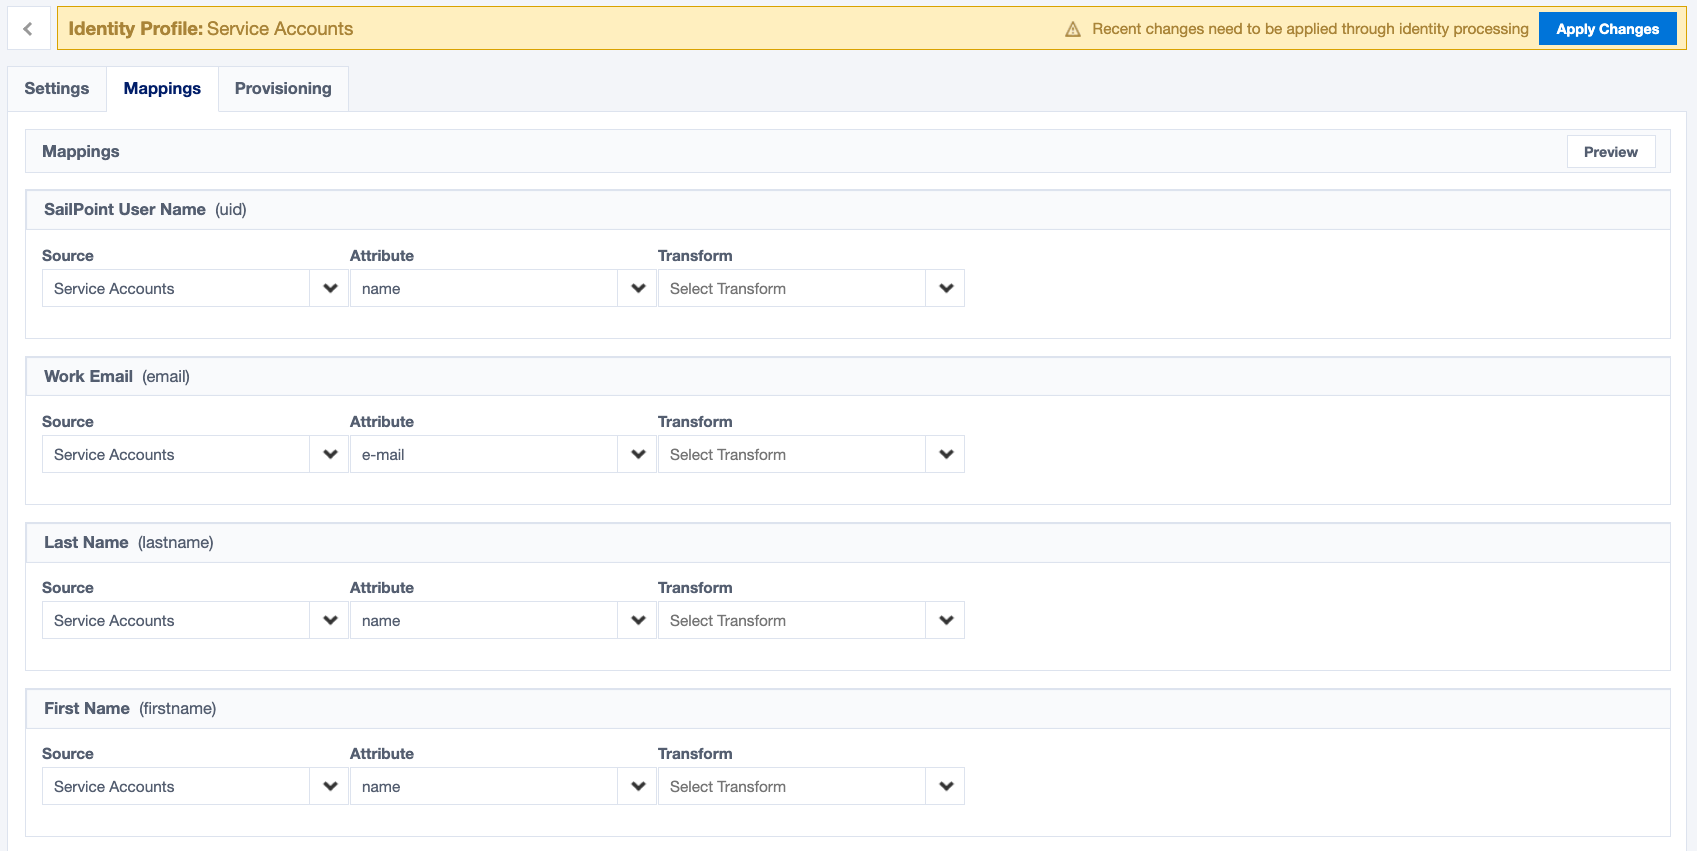
Click 'Save' and then 'Apply Changes' to create the first identity from the service accounts source. Once the identity is created, you may need to manually send the invite. To do so, go to the identity list and search for the account's name (ex. audit01).
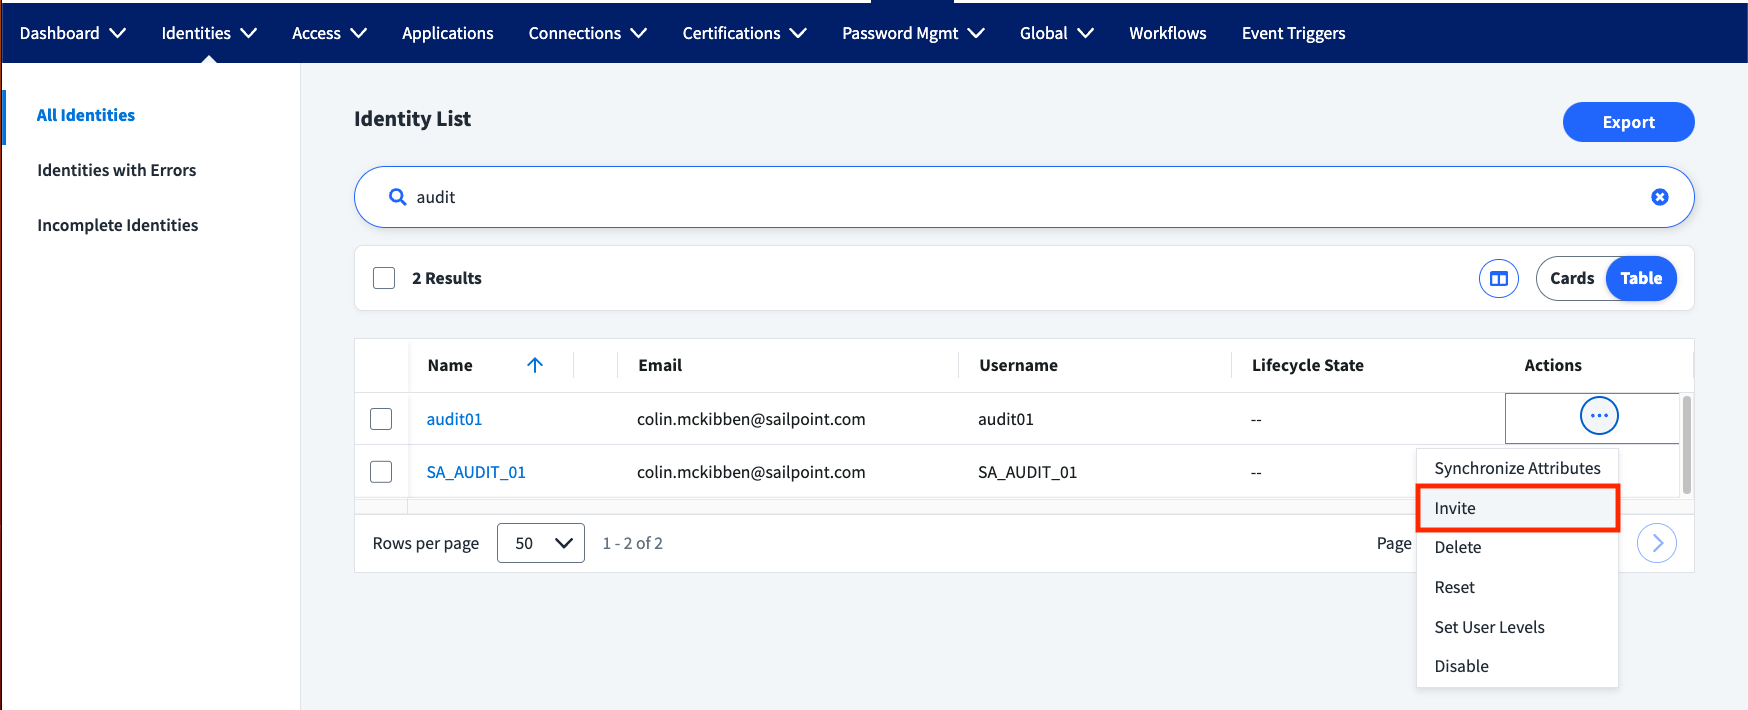
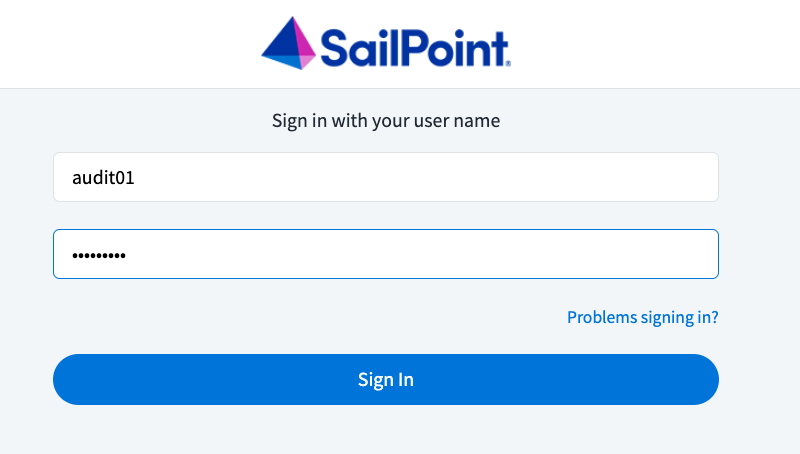
If you have not received the invite, check your junk folder or deleted folder because the invite may have been automatically filtered by your email provider. Once you receive the invite, follow the steps to register your service account. Once your service account user is registered, log in as the service account with the password you created for it.
Permissions and access tokens
New service accounts are given the basic "user" level. Depending on what you need your service account to do, you will need to modify the user level appropriately. For more information about user levels and how to set them, refer to user level permissions.
Once your service account has the appropriate user level, you can generate personal access tokens (PATs) from the service account to fulfill the needs of your integrations. You can further refine your PATs' access by applying scopes to each PAT you create.