Testing
Getting Started
When you set up a new project, the following test files are created: index.spec.ts and my-client.spec.ts. Execute the tests immediately using npm test.
$ npm run test

> test-project-5@0.1.0 test
> jest --coverage

 PASS  src/my-client.spec.ts
 PASS  src/index.spec.ts
--------------|---------|----------|---------|---------|-------------------
File          | % Stmts | % Branch | % Funcs | % Lines | Uncovered Line #s
--------------|---------|----------|---------|---------|-------------------
All files     |      72 |      100 |      75 |   70.83 |
 index.ts     |   56.25 |      100 |      50 |   53.33 | 29-56
 my-client.ts |     100 |      100 |     100 |     100 |
--------------|---------|----------|---------|---------|-------------------

Test Suites: 2 passed, 2 total
Tests:       7 passed, 7 total
Snapshots:   0 total
Time:        1.937 s
Ran all test suites.
{"level":"INFO","message":"Running test connection"}
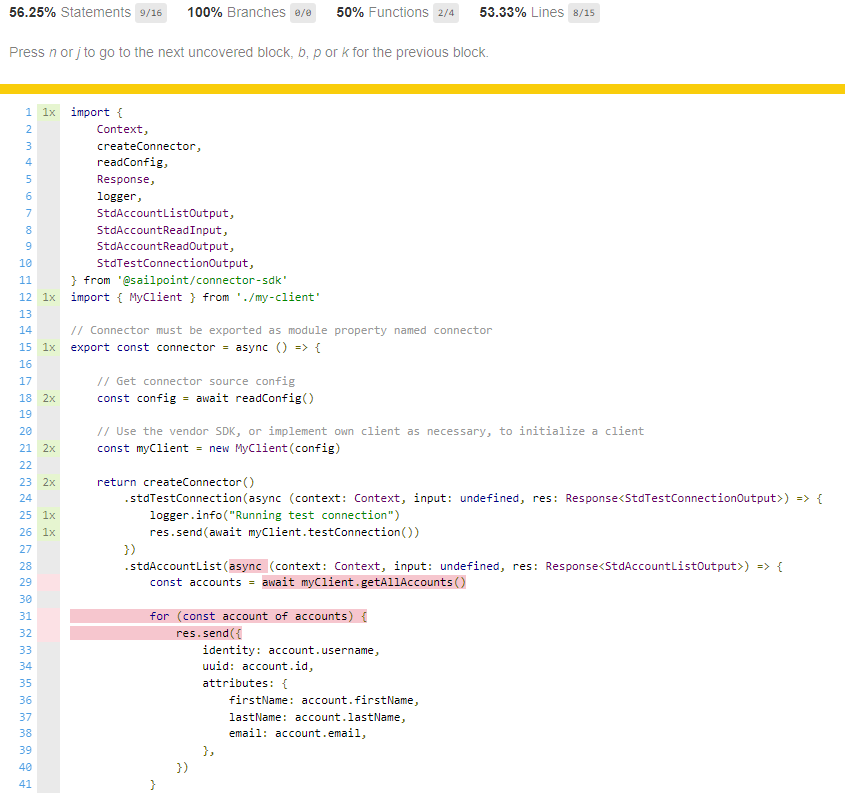
You can also view the results in an html report by viewing the index.html file inside the coverage/lcov-report folder:

Testing Techniques
Jest is a testing framework provided for javascript that focuses on simplicity. CLI includes it when it generates the project. It is recommended to use Jest to test your code.
Testing your code is important because it can highlight implementation issues before they get into production. If your tests are setup with good descriptions, the tests can also help explain why certain conditions are important in the code, so if a new developer breaks a test, he or she will know what broke and why the functionality is important.
If you have good tests setup, then you can quickly identify and fix changes or updates that occur in dependent sources.
Jest provides many different ways to test your code. Some techniques are listed below:
Test a method and evaluate the response using expect
it('get users populates correct fields', async () => {
  // Execute the method
  let res = await discourseClient.getUsers();

  // Check the response, and make sure it is an array with exactly 2 elements
  expect(res.length).toBe(2);

  // Evaluate the response email and ensure it matches the expected result
  expect(res[0].email === 'test.test@test.com');
});
-
Line 4 executes the method.
-
Line 7 asserts that the response is an array with 2 elements.
-
Line 10 evaluates the email field in the array to ensure it matches the expected result.
Test a method to ensure it calls another method using spyOn
  it('password is generated when not provided', async () => {

    // Create the spy for later use. We want to know details about this method.
    const spy = jest.spyOn(DiscourseClient.prototype as any, "generateRandomPassword")

    // Execute the method
    let res = await discourseClient.createUser({ "email": "", "username": "test" })

    // Validate that the internal method "generateRandomPassword" was called
    expect(spy).toBeCalled();

    // Validate the email field matches the expected result
    expect(res.email === 'test.test@test.com')
  })
-
Line 4 sets up the spy. “generateRandomPassword” is an internal method that gets called when the password is not provided.
-
Line 7 executes the method.
-
Line 10 checks the spy to ensure that the internal method was called.
Setting up Mock Services
The easiest way to mock your client is to set up a mock service that returns data just like your service would in production so you can test all your functions and data manipulation in your unit tests.
Mocks help test your code without actually invoking your service and allow you to simulate the kind of response your client expects to receive. They can also help you pinpoint where failures occur in case something changes on your service. By using a mock service, you can test your entire application without connecting to your service.
Create a mock file Jest provides a way to set up a mock service. It stores your mock files in a folder called __mocks__. If you name your typescript files the exact same as the files they are mocking, those mock implementations will be called instead when your unit tests are running. In the following example, a mock has been created to simulate calls to the airtable client:
import { AttributeChange, CompoundKeyType, ConnectorError, ConnectorErrorType, SimpleKeyType, StdAccountCreateInput, StdAccountDiscoverSchemaOutput } from "@sailpoint/connector-sdk"
import { AirtableAccount } from "../models/AirtableAccount"
import { AirtableEntitlement } from "../models/AirtableEntitlement"
import { InvalidConfigurationError } from "../errors/invalid-configuration-error"
import accountJson from "./account.json"
import entitlementJson from "./entitlement.json"
import schemaJson from "./schema.json"

export class AirtableClient {
    constructor(config: any) {
        // Fetch necessary properties from config.
        // Following properties actually do not exist in the config -- it just serves as an example.
        if (config.apiKey == null) {
            throw new InvalidConfigurationError('token must be provided from config')
        }
        if (config.airtableBase == null) {
            throw new InvalidConfigurationError('airtableBase base id needed')
        }
    }

    async getAllAccounts(): Promise<AirtableAccount[]> {
        const recordArray: Array<AirtableAccount> = []
        const account = Object.assign(new AirtableAccount(), accountJson)
        recordArray.push(account)
        return recordArray
    }

    async changeAccount(account: AirtableAccount, changes: AttributeChange): Promise<AirtableAccount> {
        account.updateFieldByName(changes.attribute, changes.value, changes.op)

        return account
    }

    async getAllEntitlements(): Promise<AirtableEntitlement[]> {

            const recordArray: Array<AirtableEntitlement> = []
            const entitlement = Object.assign(new AirtableEntitlement(), entitlementJson)
            recordArray.push(entitlement)
            return recordArray

    }

    async getAccount(identity: SimpleKeyType | CompoundKeyType): Promise<AirtableAccount> {
        const id = <SimpleKeyType>identity

        const account = Object.assign(new AirtableAccount(), accountJson)
        if (id.simple.id === "1234") {
            return account
        } else {
            throw new ConnectorError("Account not found", ConnectorErrorType.NotFound)
        }

    }

    async getAccountSchema(): Promise<StdAccountDiscoverSchemaOutput> {
            return schemaJson
    }

    async deleteAccount(airTableid: string): Promise<Record<string, never>> {
        return {}
    }

    async createAccount(input: StdAccountCreateInput): Promise<AirtableAccount> {
        return Object.assign(new AirtableAccount(), accountJson)
    }

    async getEntitlement(identity: SimpleKeyType | CompoundKeyType): Promise<AirtableEntitlement> {
            return Object.assign(new AirtableEntitlement(), entitlementJson)
    }

    async testConnection(): Promise<any> {
        return {}
    }
}
The method signatures are exactly the same on this mock file as the signature sin the "real" airtable.ts. The only difference is that the response objects from all the calls are made without actually calling any external dependencies, so it can be run quickly in a unit test without having to make api calls to a real client
Define json mock objects
The responses are stored in directly imported json files. This helps keep the code focused on the logic and allows the response objects to be more easily generated directly from a tool like Postman without requiring any major formatting of the response. Enable this situation by setting "resolveJsonModule": true in your tsconfig.json. The following response file is an example:
{
  "airtableId": "1234",
  "displayName": "Test User",
  "email": "test@test.com",
  "id": "1234",
  "enabled": true,
  "locked": false,
  "department": "accounting",
  "firstName": "test",
  "lastName": "user",
  "password": "password1234",
  "entitlments": ["ent1", "ent2"]
}
Use the mock in your tests
The mock is defined in the test file, and Jest does the rest. Jest overrides all the calls to use the methods in the __mocks__ folder.
import {connector} from '../src/index';
import {StandardCommand} from '@sailpoint/connector-sdk';
import {PassThrough} from 'stream';

// setup your mock object
jest.mock('../src/airtable');